Why Acting Fast on Flat Roof Repair Can Save You Thousands
Flat roof repair is one of the most time-sensitive home maintenance tasks you’ll face as a property owner. When something goes wrong, you have a narrow window to act.
Quick answer: How to repair a flat roof in 5 steps:
- Clean and dry the damaged area completely
- Treat the damage — cut blisters open, remove debris, let it dry
- Apply a compatible patch extending at least 6 inches beyond the damage
- Seal and feather the edges with a seam roller to eliminate air pockets
- Protect with UV coating or gravel ballast once cured
Flat roofs are a staple of modern homes and commercial buildings across Illinois — but their low-slope design creates a unique vulnerability: water doesn’t run off easily. Instead, it pools. And once it starts pooling, the clock starts ticking.
You have roughly 24 to 48 hours before a minor leak turns into structural rot, damaged insulation, or mold growth inside your walls and ceiling.
The tricky part? The water stain on your ceiling almost never lines up with the actual breach on the roof. Water travels laterally — sometimes several feet — under the membrane before it drips inside. That’s what makes flat roof leaks so deceptive, and why a fast, methodical response matters.
If you’re in the Chicago suburbs and need immediate help, expert roofing services can stop the damage before it compounds.
I’m Gerald Michaels, founder of Adept Construction, Inc., with nearly three decades of hands-on experience in flat roof repair and replacement across Naperville and the greater Chicagoland area. In this guide, I’ll walk you through exactly what we do on the job — so you can understand your options and make the right call for your roof.

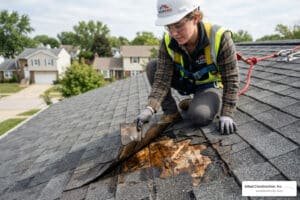
Identifying the Source of a Flat Roof Leak

Finding the source of a leak on a flat roof is often more of a detective job than a construction task. Because flat roofs are actually “low-slope” roofs, water doesn’t just fall off; it finds the path of least resistance. This often means water enters through a tiny crack in a seam or around a vent, travels along a roof joist, and eventually drips into your living room ten feet away from the actual hole.
To find the breach, we recommend a technique called interior benchmarking. Go inside your building and find the exact spot where the water is dripping or where the stain is darkest. Measure the distance from that spot to the two nearest exterior walls. When you get up on the roof, replicate those coordinates with a tape measure. This gives you a “ground zero” to start your search.
However, remember the rule of lateral travel: always look “up-slope” from your benchmark. Even a 1/4-inch per foot slope is enough to move water. We also look for these common culprits:
- Failed Flashing: More than 90% of flat roof leaks stem from failed flashing around chimneys, skylights, or parapet walls.
- Punctures and Tears: These are often caused by fallen branches or heavy foot traffic.
- Seam Separation: Over time, the adhesives or heat-welds holding membrane sheets together can fail due to the intense Illinois sun.
For more complex leaks, we use specialized tools like moisture meters or infrared thermography. These devices detect temperature differences caused by trapped moisture under the membrane, allowing us to see exactly where the insulation is wet without tearing up the whole roof. If you’re attempting a visual inspection yourself, keep this Flat Roof Repair – How to Repair a Leaky Flat Roof – DIY Guide handy to help identify different types of membrane damage.
Essential Materials and Compatibility for Flat Roof Repair
The single biggest mistake we see in DIY flat roof repair is a material mismatch. I cannot stress this enough: you must know what your roof is made of before you buy a single tube of sealant. Using the wrong product can lead to a chemical reaction that literally dissolves your roof. For example, applying an asphalt-based “wet patch” to an EPDM (rubber) roof will cause the rubber to swell and disintegrate within weeks.
Here is a quick compatibility guide we use at Adept Construction, Inc.:
| Roof Type | Material Description | Recommended Repair Product | Avoid These Products |
|---|---|---|---|
| EPDM | Black, looks like a giant inner tube | EPDM-specific tape or patches & primer | Asphalt, Tar, Petroleum-based products |
| TPO / PVC | White or grey, feels like reinforced plastic | Heat-welded patches or TPO-specific adhesives | Asphalt, EPDM primers |
| Modified Bitumen | Granular surface, looks like rolled shingles | Asphalt cement or torch-down patches | Silicone (without proper primer) |
When selecting products, we generally lean toward high-quality polyurethane sealants or specialized flat roofing systems materials. Polyurethane offers incredible flexibility, which is vital in the Midwest where temperatures can swing 50 degrees in a single day.
One “pro tip” for any patch you cut: always round the corners. Sharp 90-degree corners are weak points where the wind and water can easily catch and start peeling the patch back up. By cutting a circle or a rectangle with rounded edges, you ensure the patch stays flat and bonded for years.
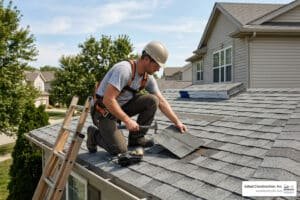
The 5-Step Process for Permanent Flat Roof Repair
When we train our team at Adept Construction, Inc., we tell them that a successful repair is 90% preparation and 10% application. If you slap a patch over a dirty, wet roof, it will fail. Follow this methodical 5-step process for a repair that actually lasts.
1. Surface Preparation
The area must be pristine. Start by clearing all loose debris, gravel, and standing water. Use a stiff-bristled brush to scrub the membrane. For bitumen roofs, use mineral spirits to cut through the grime; for EPDM, use a dedicated EPDM cleaner. The goal is to get back to the original color of the membrane. If the surface isn’t 100% dry, the adhesive won’t bond. We often use a heat gun or a leaf blower to ensure every bit of moisture is gone.
2. Damage Treatment
How you treat the damage depends on what you find. If you have a “blister” (a bubble filled with air or water), do not just patch over it. Use a utility knife to make a shallow “X” cut. Peel back the flaps and let the interior dry completely. If there is wet insulation underneath, it must be replaced. Once dry, apply roofing cement under the flaps and press them back down before moving to the next step. For more on specific damage types, see Flat Roof Repair: How to Repair a Flat Roof Leak.
3. Patch Application
Cut your patch material (matching your roof type) so it extends at least 6 inches beyond the damage in every direction. If you’re using a “peel-and-stick” EPDM patch, apply the primer to the roof first and wait for it to become “tacky” (usually 5-10 minutes). Carefully lay the patch down, starting from one side to avoid trapping air bubbles.
4. Sealing and Feathering
Once the patch is down, use a heavy seam roller. Apply firm pressure from the center of the patch outward to the edges. This ensures 100% contact with the adhesive. Finally, apply a bead of lap sealant along the edge of the patch. This is called “feathering”—it creates a smooth transition so water flows over the patch rather than getting caught on the edge.
5. UV Protection
The sun is the primary enemy of roofing materials. Once your patch has cured (usually 24-72 hours), you need to protect it. If your roof has a gravel ballast, move the rocks back over the area. If it’s a smooth membrane, apply a reflective elastomeric coating over the patch. This prevents the new material from becoming brittle and cracking under UV exposure.
Professional Flat Roof Repair in Naperville and Downers Grove
In the local Chicagoland area, flat roofs face a unique set of challenges. We deal with “thermal shock”—the rapid expansion and contraction of roofing membranes as the temperature drops from a sunny 70°F to a freezing 30°F overnight. This movement puts immense stress on seams and flashing.
If you are looking for roof repair in Naperville IL or roof repair in Downers Grove IL, it is important to know when a DIY patch is no longer enough. We generally recommend a professional inspection if:
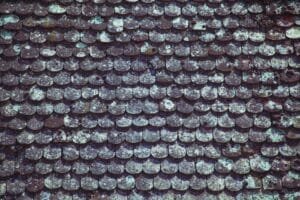
- The roof is over 20 years old: Most flat roofs have a 20-25 year lifespan. At this point, the entire membrane becomes brittle.
- There are more than 5 patches: If your roof looks like a quilt, the structural integrity is likely compromised.
- You feel “spongy” spots: If the roof feels soft or bouncy when you walk on it, the wooden decking underneath is likely rotting. This is a structural hazard that a patch cannot fix.
Cost Factors for Flat Roof Repair
The cost of flat roof repair is influenced by the material type, the size of the damage, and the height of the building. On average:
- Minor Repairs: Small punctures or resealing a single vent pipe typically cost between $400 and $600.
- Major Repairs: Extensive seam re-attachment or patching large sections (all-day jobs) range from $1,200 to $1,500.
- Material Costs: Expect to pay $4 to $8 per square foot for high-quality membrane materials.
For larger facilities, you might want to explore Commercial Flat Roof Repair Illinois to understand the nuances of industrial-scale maintenance.
Safety Precautions for Flat Roof Repair
Safety is our top priority. Even though a flat roof feels like a floor, it is a dangerous work environment.
- Ladder Safety: Ensure your ladder is tied off and extends at least three feet above the roofline.
- Fall Protection: If you are working near the edge, use a safety harness.
- Weather Awareness: Never work on a wet or icy roof. Even a slight mist can turn a TPO roof into a skating rink.
- Never Work Alone: Always have someone on the ground who can call for help if needed.
For more safety tips tailored to our region, check out Flat Roof Illinois.
Frequently Asked Questions about Flat Roof Repair
How long does a DIY flat roof patch last?
A well-executed DIY patch can last several years if the surface was prepared correctly and the materials were compatible. However, it is fundamentally a localized fix. It won’t stop the rest of an aging roof from developing new leaks. Think of a patch as “first aid”—it stops the bleeding, but it doesn’t replace the need for long-term health checks.
What is ponding water and why is it dangerous?
Ponding water is defined as any water that remains on the roof surface for more than 48 hours after a rainstorm. It is the number one enemy of flat roofs. The weight of the water (about 5 pounds per inch per square foot) can cause the roof deck to sag, which in turn creates a deeper pool. Furthermore, standing water acts like a magnifying glass for UV rays, accelerating the degradation of the membrane.
When should I choose a full coating instead of a patch?
If your roof is structurally sound but the surface is showing widespread “alligatoring” (small cracks) or UV damage, a full restorative coating is often the best move. A high-quality silicone or elastomeric coating can add 10 to 15 years to your roof’s life for a fraction of the cost of a full replacement. You can learn more about this in our guide on What’s the Best Flat Roof Coating for Your Home?
Conclusion
At Adept Construction, Inc., we’ve seen every type of flat roof failure imaginable over the last 30 years. From minor punctures in Downers Grove to massive seam failures on commercial buildings in Naperville, we know that the key to a successful flat roof repair is a combination of speed, the right materials, and meticulous preparation.
While a handy property owner can certainly handle a small puncture or a minor blister, the risks of hidden structural rot or material incompatibility are high. If you aren’t 100% sure about the source of your leak or the type of membrane you have, it’s always safer to call in the pros.
We pride ourselves on superior customer service and high-quality workmanship. Whether you need a quick patch or a full roof installation, we are here to help. We offer free estimates for all our clients in the western suburbs. Contact us today to schedule your inspection and ensure your property stays dry through the next Illinois storm.