
When Your Roof Is Leaking Right Now: What to Do First
Temporary roof repair is the fastest way to stop water from destroying your home while you wait for a professional fix. Here’s a quick-reference summary of your best options:
| Method | Best For | Approx. Cost | Lasts |
|---|---|---|---|
| Heavy-duty tarp (10-12 mil) | Large damage, missing shingles | $50-$150 | 30-90 days |
| Roofing cement | Cracks, flashing gaps | $10-$20 | Several months |
| Self-adhesive butyl tape | Small holes, flat roofs | $15-$30 | Several months |
| Rubber sheet patch | Flat or low-slope roofs | $20-$50 | Up to 5 years |
| Interior plastic sheeting | Last resort, active storm | Minimal | Hours only |
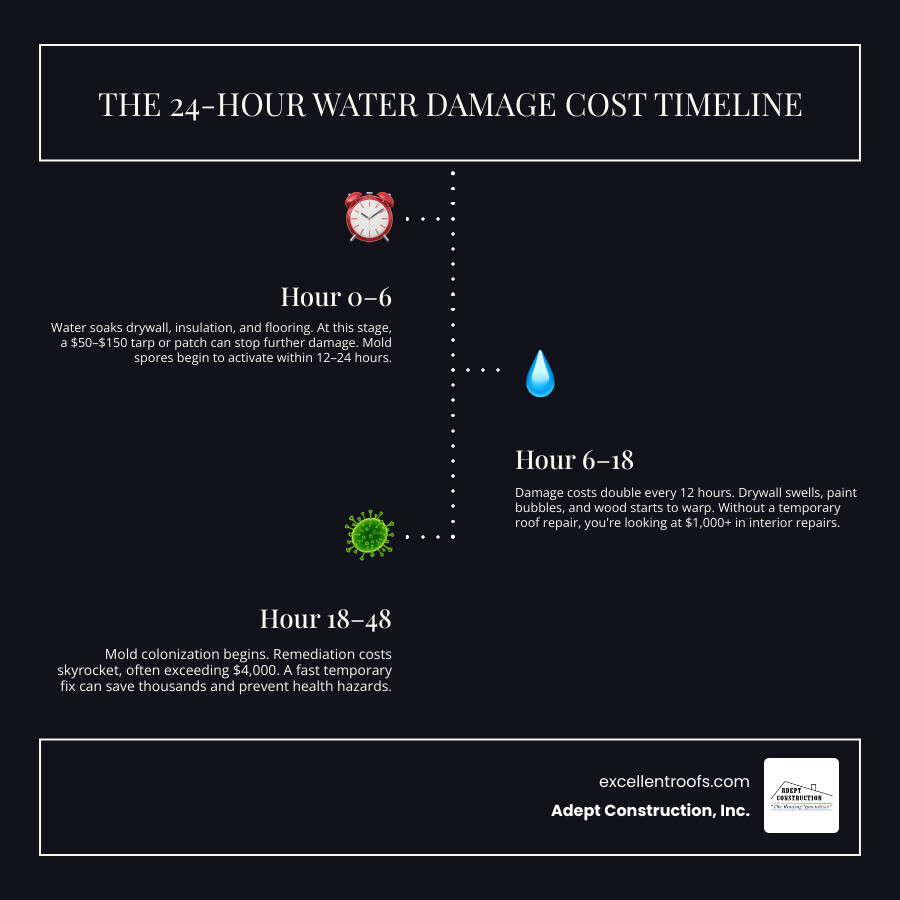
Water damage is not patient. According to IICRC S500 standards, interior water damage costs roughly double every 12 hours after a leak begins. A $400 emergency tarp job can prevent more than $4,000 in drywall replacement, flooring repairs, and mold remediation — and mold can begin growing within just 24 to 48 hours of water exposure.
That math makes acting fast one of the most important financial decisions you can make as a homeowner. Whether a storm just tore through your neighborhood or you woke up to a wet ceiling, the steps you take in the next few hours matter enormously. This guide will walk you through exactly what to do — safely, and without making things worse.
I’m Gerald Michaels, founder of Adept Construction, Inc., with nearly three decades of roofing experience in the Chicago suburbs helping homeowners navigate everything from minor leaks to major storm damage — including guiding them through temporary roof repair decisions in emergencies. I’ll share what actually works in the field, not just in theory.
The Financial Impact of Delaying Roof Mitigation
When water breaches your home’s primary defense system, the clock starts ticking. Many homeowners hesitate to act because they are waiting to hear back from their insurance adjuster or are hoping the rain will stop on its own. However, delay is the single most expensive mistake you can make during a roofing emergency.
According to restoration industry data, the cost of interior restoration escalates exponentially with every hour of exposure. A small, unaddressed drip does not stay small. Water quickly travels along rafters, saturates attic insulation, ruins drywall ceilings, warps hardwood flooring, and destroys personal belongings. What could have been a simple, under-$200 DIY temporary roof repair or a quick professional dry-in can balloon into a massive multi-thousand-dollar reconstruction project.
Furthermore, mold spores require only moisture, a food source (like drywall paper or wood framing), and 24 to 48 hours to colonize. Once mold takes hold, you are no longer looking at a straightforward roofing repair; you are looking at professional mold remediation, which typically adds anywhere from $1,500 to $30,000 to a basic water damage claim.
Taking immediate action to stop the leak is not just about comfort—it is a financial necessity. If you want to prevent a minor leak from turning into a structural nightmare, you must take active steps to mitigate the damage. For a comprehensive look at how to handle active water entry, refer to our detailed guide, Don’t Let the Rain Win a Guide to Stopping Roof Leaks.
Essential Materials for Emergency Roof Patches
If you need to patch a leaking roof temporarily, you must choose the right material for the job. Using the wrong patch can lead to premature failure, leaving your home vulnerable to the next passing storm.
- Tar Paper and Roofing Felt: This is the standard underlayment material used in traditional roofing. It is excellent for layering underneath shingles to shed water. When applied with plastic roofing cement, it can create a highly effective multi-ply composite patch.
- String-Reinforced Poly Sheeting: Far superior to standard, woven blue tarps, string-reinforced poly features a checkered high-strength grid that prevents tearing. As discussed in expert resources like Temporary Emergency Roofing, by A.F.. First Place Supply, Inc. , string-reinforced poly can withstand harsh elements for months without degrading.
- Rubber Sheets (EPDM): Rubber sheets act like a heavy-duty raincoat for your roof. They are incredibly easy to roll out, highly flexible, and completely waterproof, making them the gold standard for flat or low-slope roof sections.
- Silage Tarps: Often sourced from agricultural supply stores, these thick, UV-resistant black-and-white tarps are designed to protect silage piles for years. They are an incredibly durable, cost-effective alternative for covering large areas of storm damage.
Step-by-Step Guide to Safe Temporary Roof Repair
Before you even think about grabbing a ladder, we must address the absolute priority: safety. Roof work is inherently dangerous. Falls from roofs cause over 100 deaths and thousands of debilitating injuries every year in the United States.
Never step onto a roof during a storm, in high winds (above 15 mph), or when the surface is wet, icy, or covered in morning dew. If your roof has a steep pitch (greater than 5:12 or 8:12), do not attempt to walk on it without professional fall protection equipment. Always work with a helper on the ground who can secure (“toe”) the ladder and call for help in an emergency. Ensure your extension ladder extends at least 3 feet (about 3 to 4 rungs) past the roof’s edge so you have a secure handhold when transitioning on and off the roof.
How to Apply a Temporary Roof Repair Tarp
When severe weather rips away shingles, a heavy-duty tarp is your best defense. Follow these steps to secure a tarp so it won’t blow away in the next windstorm:
- Assess and Measure: From the ground (using binoculars if possible), locate the damaged area. Select a heavy-duty tarp (10-12 mil thickness; avoid cheap 5 mil blue tarps, which shred within weeks) that is large enough to extend at least 4 feet past the damage on all sides.
- Prepare the Top Ridge: If the damage is near the peak of the roof, the tarp must wrap over the ridge by at least 3 feet to prevent water from running underneath the top edge.
- Wrap the Anchor Boards: Cut 2×4 lumber or 1×2 wood batten strips to the width of your tarp. Wrap the top edge of the tarp around a board at least twice. This distributes the tension and prevents the screws from ripping through the plastic. Use an “underhand” roll for horizontal boards to create a natural water-shedding ramp.
- Secure to the Deck: Drive 2.5-inch or 3-inch deck screws through the wood-sandwiched tarp directly into the roof decking (plywood or OSB). Space the screws roughly every 16 inches. Avoid driving screws directly through shingles into empty space; make sure you are biting into solid wood.
- Tension and Anchor the Sides: Pull the tarp taut down the slope of the roof. Wrap the bottom edge around another 2×4 board. Screw this board down, or if it extends past the eave, let it hang as a natural weighted anchor. Secure the side edges with additional batten strips.
For a deeper dive into this physical anchoring technique, check out the How to Tarp a Damaged Roof | Emergency Roof Tarp Guide | Roofs Wiki .
Applying Roofing Cement for Crack and Flashing Repairs
Did you know that over 40% of residential roof leaks originate at the flashing? Whether it is around a chimney, a plumbing vent stack, or in a valley, flashing failures are the single largest cause of water intrusion.
If you find a crack in your flashing or a localized puncture in your shingles, plastic roofing cement is your go-to solution. It acts like a heavy-duty adhesive band-aid.
- Locate and Clean: First, pinpoint the source of the leak. For tips on finding tricky leaks, read our guide on How to Detect Roof Leaks in Less Than an Hour. Use a wire brush to remove dirt, moss, leaves, and crumbling old sealant. The surface must be as clean as possible for the cement to stick.
- Apply the Cement: Using a trowel or putty knife, scoop a generous amount of plastic roofing cement and spread it over the crack. Apply it at least 2 inches past the edges of the damaged area on all sides, pressing it firmly into the gap.
- Create a Multi-Ply Patch (Optional but Recommended): For a stronger, longer-lasting patch, press a piece of tar paper or roofing felt directly into the wet cement, then apply a second layer of roofing cement over the top. This creates a reinforced composite patch that can easily withstand heavy rains while you wait for a permanent fix.
Using Self-Adhesive Tape for a Quick Temporary Roof Repair
For small punctures, cracked shingles, or minor leaks on flat metal or rubber roofs, self-adhesive butyl roofing tape is incredibly fast and effective.
- Prep the Surface: Adhesion is everything. Clean the area thoroughly. If the shingles are wet or freezing, the tape will not stick. Use a rag to dry the area completely.
- Cut and Round the Corners: Cut a piece of self-adhesive butyl tape that is at least 4 inches larger than the damaged area on all sides. Always round the corners of the tape with scissors before applying it; square corners catch the wind and peel up much faster than rounded ones.
- Apply and Roll: Peel away the backing paper. Press the tape firmly over the damage, starting from the center and working your way outward to push out any trapped air bubbles. Use a small roller or the back of a screwdriver to apply firm pressure across the entire patch.
If you are dealing with storm damage and only have standard household supplies, you can use high-quality waterproof duct tape as an absolute stop-gap. While duct tape won’t damage dry shingles immediately, prolonged sun exposure will bake a sticky, hard-to-clean residue onto your roof. Learn more about the pros and cons of this approach in the Duct Tape and Tarp Roof Repair: Quick Temporary Fixes for Storm Damage – New England Metal Roof .
DIY vs. Professional Emergency Roof Services
While a DIY temporary roof repair can save your ceiling in a pinch, there is a fine line between a smart temporary fix and a dangerous mistake.
If you observe structural sagging, do not step onto the roof. A sagging roof deck indicates that the underlying rafters or plywood are rotted or structurally compromised, presenting a severe fall-through hazard. Similarly, if your home is two stories or has a steep, complex roof layout, leave the climbing to the pros.
In the Downers Grove and Naperville areas, severe storms can bring heavy winds and hail that require professional equipment and expertise. Hiring a professional to install an emergency tarp typically costs between $300 and $800, whereas DIY materials run about $50 to $150. However, a professional installation is anchored properly, guaranteed not to blow off, and keeps you safely on the ground.
If you are located in our service areas, you can access our dedicated local teams for rapid assistance:
- For local help in Downers Grove, visit our Downers Grove roof repair services page.
- For local help in Naperville, visit our Naperville roof repair services page.
- To learn more about how we handle immediate storm responses, read about Emergency Roof Repair in Naperville.
Navigating Insurance Claims and Documentation
Taking immediate steps to temporarily repair your roof is actually a requirement under most standard HO-3 homeowners insurance policies. These policies contain a “Loss Mitigation” clause, which states that the property owner must take reasonable, immediate actions to protect the home from further damage after a loss. Failing to tarp an exposed roof can give your insurer a reason to deny coverage for secondary water damage (like ruined drywall or mold).
To ensure your insurance claim is successful, follow these documentation best practices:
- Document Before You Touch Anything: Take clear, date-stamped photographs and videos of the damage from multiple angles before applying any tarps, cement, or tape. Claims supported by photo documentation taken within 72 hours of the storm are accepted three times more often than those submitted later.
- Photograph the Repair Process: Take photos of your temporary patch or tarp once it is installed to prove you fulfilled your duty to mitigate the damage.
- Keep Every Receipt: Save the receipts for all materials you purchase—tarps, lumber, screws, tape, or roofing cement. Your insurance policy typically covers these emergency mitigation costs, and you can submit these receipts for direct reimbursement.
Frequently Asked Questions about Emergency Roof Patches
How long does a temporary roof repair last?
A properly installed emergency tarp secured with wood anchor boards typically lasts 30 to 90 days, depending on local weather conditions. Heavy-duty, UV-stabilized tarps can sometimes last up to six months. Patches made with high-quality roofing cement or butyl tape can seal out water for several months, but they degrade under direct sunlight and temperature swings. These are stop-gaps to buy you time—not permanent replacements.
Can you repair a roof leak from the inside?
Yes, but only as a temporary “last resort” to protect your ceiling during an active storm when it is too dangerous to go outside. You can staple thick plastic sheeting to the underside of the roof rafters in your attic to redirect water. Angle the plastic so the water drains into a bucket or plastic bin. This does not fix the roof leak; it simply manages the water inside your attic until a roofer can perform an exterior repair.
What should be in an emergency roof repair kit?
Every homeowner should keep a basic emergency dry-in kit in their garage or basement. It should include:
- One heavy-duty, UV-resistant tarp (at least 10-12 mil thick, minimum size 15′ x 20′)
- Two or three 8-foot 2×4 wood boards (for anchor strips)
- One box of 3-inch exterior deck screws
- One tub of plastic roofing cement and a cheap putty knife
- One roll of heavy-duty, self-adhesive butyl roofing tape
- A cordless drill and a utility knife
Conclusion
A temporary roof repair is a critical first step to protect your home, save your ceilings, and prevent thousands of dollars in secondary water and mold damage. However, these patches are only designed to buy you time. Relying on a temporary patch for too long will eventually lead to failure, exposing your home to the elements once again.
At Adept Construction, Inc., we have been serving the Downers Grove and Naperville communities since 1997. We specialize in transitioning temporary emergency patches into beautiful, durable, permanent roofing systems. Whether you need a minor shingle replacement or a complete roof overhaul, our family-owned team is here to help with superior customer service and high-quality workmanship.
Don’t let a temporary fix turn into a long-term risk. Contact us today for a free estimate on our professional roof repair services, and let’s keep your home bone dry.