The Hidden Danger Above Your Head: What Every Homeowner Needs to Know About Roof Leak Detection
Roof leak detection is the process of locating where water enters your home through the roof — and it almost never starts where you see the damage inside.
Here is what you need to know right now:
- 90% of roof leaks originate at penetrations — chimneys, vents, skylights, and flashing
- Water travels along rafters and decking, often 3–10 feet away from where it drips inside
- Mold can begin growing within 24–48 hours of insulation or drywall getting wet
- 1 in 4 homes will experience a significant roof leak this year
- Most leaks can be traced in under an hour using a flashlight, a garden hose, and a helper
The frustrating truth is this: that water stain on your ceiling is rarely sitting directly below the problem. Water moves sideways, downhill, and along hidden framing before it ever drips. That is what makes finding the source so tricky — and so important to get right the first time.
Acting fast matters. A $200 repair left unaddressed for 48 hours can quietly become a $2,000 job once mold, insulation damage, or rotted decking enters the picture. If you are already seeing stains, peeling paint, or smelling something musty, the clock is already running.
Finding and fixing leaks quickly starts with knowing where to look — and having the right professional roofing solutions available when the problem goes beyond what you can safely handle yourself.
I’m Gerald Michaels, founder of Adept Construction, Inc., and I’ve spent nearly three decades diagnosing and repairing roofs across Naperville, Downers Grove, and the greater Chicago suburbs — which means I’ve seen how roof leak detection done wrong leads to costly, repeat problems. In this guide, I’ll walk you through the exact process my team uses to find leaks fast, so you can protect your home before minor water intrusion becomes major structural damage.

Identifying Common Causes and Signs of Roof Leaks
If you want to master roof leak detection, you have to stop looking at the shingles and start looking at the “holes.” As of April 2026, industry data continues to confirm the “90% penetration rule”: the vast majority of leaks occur where something breaks the surface of the roof.

The most common culprits are:
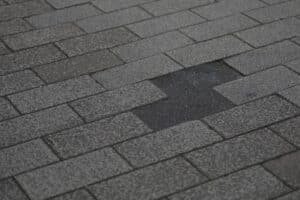
- Flashing Failures: This is the metal material installed to direct water away from critical areas. It is the number one source of leaks, particularly in valleys or where the roof meets a wall.
- Vent Boots: These rubber or plastic seals around plumbing pipes have a lifespan of only 10–15 years. In our Illinois climate, the constant freeze-thaw cycles cause them to crack and rot long before your shingles wear out.
- Chimneys and Skylights: These are essentially giant holes in your roof. If the sealant or counter-flashing pulls away, water finds an easy path inside.
Understanding what causes roof leaks is the first step in narrowing down your search. Beyond the obvious drip, keep an eye out for subtle signs like sagging drywall, peeling paint near the ceiling, or a persistent musty odor in the attic. If you spot these, you need to follow a systematic guide for finding leaks before the structural integrity of your home is compromised.
Step-by-Step Guide to Interior Detection
The most effective way to find a leak is actually from the inside out. By entering your attic, you can see exactly where the water is making its mark on the wood. However, you must remember the 3–10 feet uphill rule: gravity pulls water down the slope of your roof rafters. This means the entry point is almost always significantly higher and further “up” the roof than the stain on your ceiling.
When you’re dealing with a small roof leak, the signs can be faint. Look for darkened wood, which indicates moisture absorption, or rusty nails. Water often travels along the shank of a nail, leaving a “trail” of rust that points directly to the source. Compressed or discolored insulation is another “smoking gun”—water weighs down the fiberglass, leaving a permanent divot.
Finding Leaks in the Attic
To perform a thorough attic inspection, you need a high-powered flashlight. Start at the drip point and move “uphill” toward the ridge. A pro tip we use at Adept Construction is the “dark room” technique: turn off all your lights and your headlamp during a sunny day. If you see pinpricks of daylight, you’ve found a gap where water can get in. Look for water trails—shiny or dark streaks on the underside of the roof deck.
Distinguishing Leaks from Condensation
Not every wet spot in an attic is a roof leak. It is vital to distinguish between active water intrusion and attic condensation.
- Active Leaks: Usually localized, resulting in specific drips or trails, and worsen significantly during rain.
- Condensation: Usually appears as even moisture distribution or frost across the entire underside of the roof. This is often a ventilation issue rather than a structural failure.
- Plumbing: If the moisture is near a bathroom or kitchen vent, ensure the pipe hasn’t disconnected, venting humid air directly into the attic space.
How to Perform a Professional-Grade Hose Test
If the attic is dry but you suspect a leak, it’s time for the hose test. This is the gold standard for roof leak detection when the sky is clear.

We recommend a two-person protocol for safety and accuracy. One person stays in the attic with a flashlight, while the other is on the roof with a garden hose. Follow these steps:
- Bottom-Up Method: Start at the lowest suspected point (like the gutters or eaves) and work your way up. If you start at the top, water will run down and mask the true entry point.
- 6×6 Isolation Zones: Focus on a small area, roughly 6 feet by 6 feet, at a time.
- 5–10 Minute Soak Cycles: Spend at least five minutes soaking each zone. It takes time for water to penetrate the layers of shingles and underlayment before it shows up in the attic.
For a deeper dive into the materials involved, check out our asphalt roof leak repair ultimate guide.
Isolating Hidden Roof Leak Detection Points
During your hose test, pay extra attention to “transition points.” These include:
- Pipe Boots: Spray directly at the base of the rubber seal.
- Step Flashing: Soak the area where the roof meets a dormer or wall.
- Valley Intersections: Where two roof planes meet, water volume is highest.
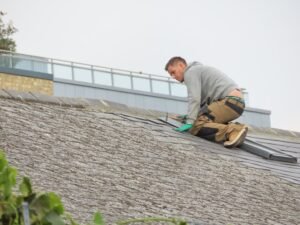
Safety Protocols for Exterior Inspection
Safety is our top priority in Downers Grove and Naperville. If you must use a ladder, follow the 4:1 ratio: for every 4 feet of height, the base of the ladder should be 1 foot away from the wall. If the roof is steep or wet, do not climb it. You can often perform a successful exterior survey using binoculars from the ground, looking for lifted shingles or cracked caulk around the chimney.
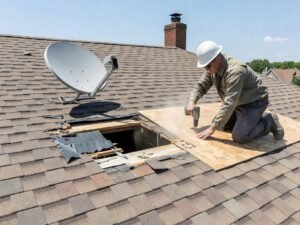
Advanced Technologies for Non-Destructive Roof Leak Detection
Sometimes, a leak is so elusive that traditional methods fail. This is common in commercial buildings or homes with complex flat roofing systems. In these cases, we turn to non-destructive technology.
Modern roof leak detection utilizes ASTM D7877 standards to ensure accuracy. These methods allow us to find moisture without tearing up your roof. This is especially critical for commercial roof leak repair, where large surface areas make manual searching impossible.
Thermal Imaging and Infrared Scans
Thermal cameras are a game-changer. They don’t “see” water; they see temperature anomalies.
During the evening, wet insulation holds heat longer than dry insulation (thermal mass). Conversely, during the day, evaporating water cools the surface. These temperature differences allow us to map out hidden saturation behind walls or under membranes that are invisible to the naked eye.
Electronic Leak Detection (ELD) Methods
For high-end residential or commercial roofs, ELD is the most precise tool available.
- Low-Voltage Scanning: Uses a damp surface to create an electric field; a breach in the membrane completes a circuit, pinpointing the leak to within a fraction of an inch.
- High-Voltage Testing: Used on dry surfaces, this method uses a “spark” tester to find holes in the membrane.
- Conductive Primers: Some modern roofs are now installed with conductive primers beneath the membrane to make future roof leak detection instantaneous and 100% accurate.
Frequently Asked Questions about Roof Leak Detection
| Method | DIY Cost | Professional Cost | Accuracy |
|---|---|---|---|
| Visual Attic Check | $0 (Flashlight) | $150 – $300 | Medium |
| Hose Test | $0 (Garden Hose) | $200 – $400 | High |
| Thermal Imaging | $300+ (Tool Rental) | $400 – $600 | Very High |
| Electronic Leak Detection | N/A | $500 – $1,000+ | Pinpoint |
Why does my roof only leak during heavy rain?
This is a common frustration for homeowners in Naperville. A roof might stay dry during a light drizzle but pour during a thunderstorm. This usually happens because of volume and velocity. High-volume rain can overflow gutters, backing water up under the shingles. Furthermore, wind-driven rain can push water horizontally under flashing or into ridge vents that are normally protected from vertical rainfall.
How much does professional roof leak detection cost?
In the Chicago suburbs, a professional diagnostic visit typically ranges from $150 to $400. While this might seem like an extra expense, our Naperville roof leak repair guide highlights that a pro can often find a leak in 20 minutes that a homeowner might miss for three years. The diagnostic value lies in preventing the “guess-and-check” method of repair, which wastes money on materials that don’t fix the actual problem.
Can I use a drone to find a roof leak?
Yes! Drones equipped with high-resolution zoom lenses allow us to inspect steep-slope roofs safely from the ground. Advanced drones can even carry thermal payloads to perform infrared scans of large commercial roofs, providing a structural overview that is impossible to get from a ladder.
Conclusion and Emergency Next Steps
At Adept Construction, Inc., we know that a leaking roof is more than just a maintenance issue—it’s a threat to your family’s comfort and your home’s value. Whether you are in Naperville or need roof repair in Downers Grove, our team is ready to apply these expert detection methods to protect your property.
Don’t let a small drip turn into a major renovation. We specialize in high-quality workmanship and superior customer service, ensuring that once we find your leak, it stays fixed.
Ready to stop the damage? We offer free estimates for all residential and commercial projects. Contact us today to schedule your professional inspection and get the peace of mind you deserve.