

Why Roof Valley Leak Repair Can’t Wait
Roof valley leak repair is one of the most urgent fixes a homeowner can make — and one of the most misunderstood. Here’s what you need to know right away:
Quick Answer: How to Fix a Leaking Roof Valley
- Locate the leak — inspect your attic with a flashlight during or after rain to trace water back to its entry point
- Remove damaged shingles — strip shingles at least 3 feet back on both sides of the valley centerline
- Inspect the roof deck — replace any rotted plywood or OSB before proceeding
- Install ice and water shield — apply a self-adhering membrane extending 24–36 inches up each side of the valley
- Lay metal valley flashing — use W-style or V-style metal, overlapping sections by 6 inches, bottom to top
- Reinstall shingles — keep nails 6–10 inches from the centerline and clip top shingle corners at 45 degrees
- Test the repair — run a garden hose over the area for 15–20 minutes while checking the attic
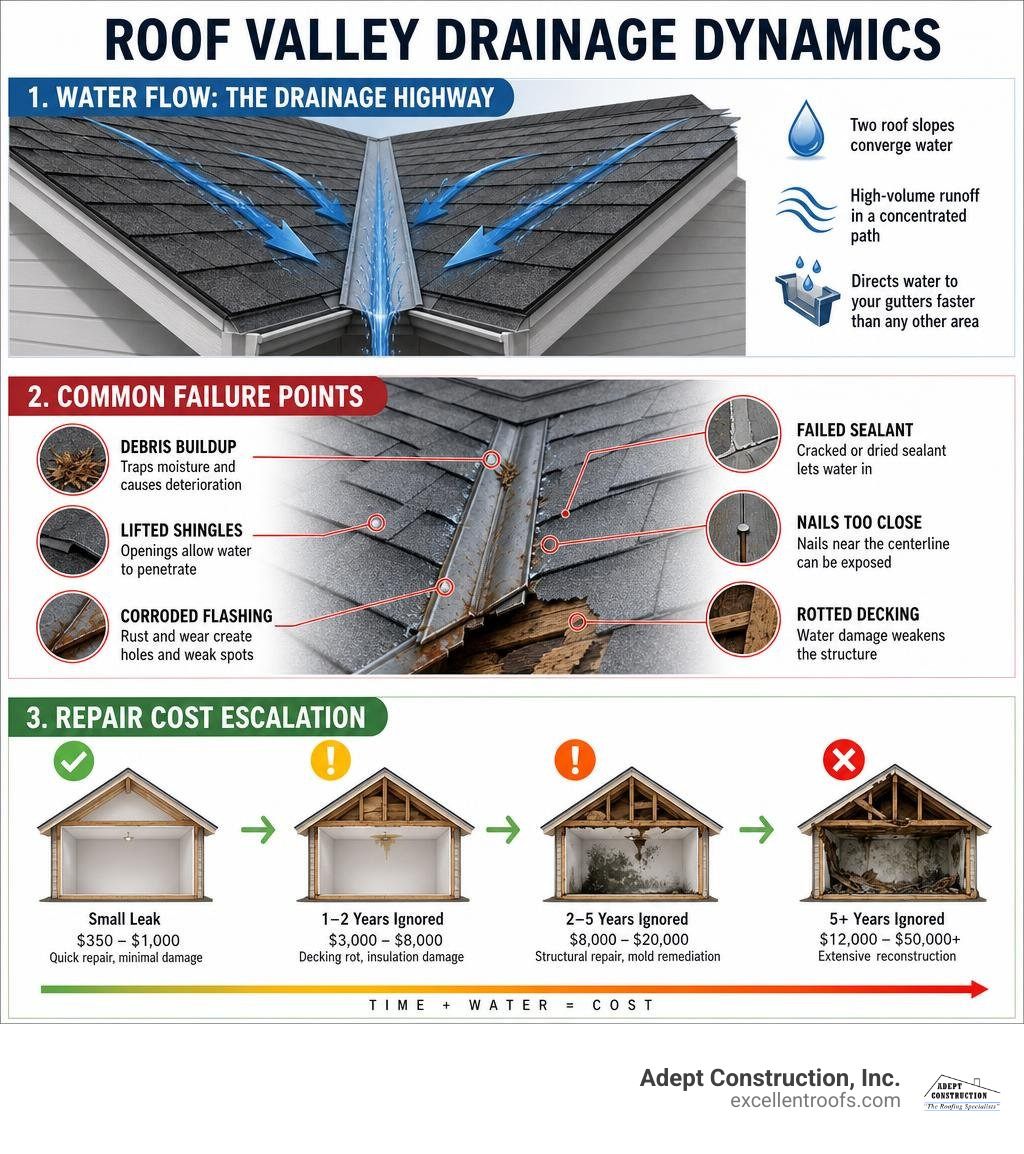
Roof valleys are the V-shaped channels where two roof slopes meet. They act as the primary drainage highway for your entire roof — funneling rain, snowmelt, and debris toward your gutters faster than any other section. That high water volume is exactly what makes them so vulnerable.
80–90% of all flashing-related roof leaks originate in roof valleys. And the damage doesn’t stay contained. A leak left untreated for just one to two years can rot the deck, soak insulation, and trigger mold growth — turning a $350–$1,000 repair into a $12,000–$50,000+ structural nightmare.
The tricky part? A water stain on your ceiling rarely appears directly below the leak. Water travels sideways along rafters and joists before it drips — sometimes 10 to 15 feet away from the actual entry point. That’s why so many homeowners patch the wrong spot and wonder why the leak keeps coming back.
If you’re in the Chicago suburbs and need expert help, Adept Construction, Inc. has been diagnosing and repairing valley leaks since 1997. We offer free estimates — so there’s no reason to wait.
I’m Gerald Michaels, founder of Adept Construction, Inc., and with nearly three decades of hands-on roofing experience — including hundreds of roof valley leak repair projects across Naperville and the surrounding suburbs — I’ve seen how fast a small valley leak becomes a major structural problem. In this guide, I’ll walk you through exactly how to diagnose, repair, and prevent valley leaks the right way.
Understanding Roof Valleys: Anatomy, Types, and Leak Vulnerability
A roof valley is formed at the intersection where two sloped roof planes meet at an inside angle. Because water flows downward along both adjacent slopes, the valley serves as a funnel that concentrates high-velocity runoff. During a heavy Midwestern rainstorm, thousands of gallons of water cascade down this single intersection within hours.
In Northern Illinois climate conditions—such as around Downers Grove and Naperville—valleys face severe seasonal stress. Winter brings frequent freeze-thaw cycles. When water traps along the valley line and freezes, it expands by 9% in volume. This expansion exerts mechanical force, lifting shingle edges, expanding nail holes, and pushing flashing seams apart.
Furthermore, “dead valleys” (flat or low-slope areas where a roof slope terminates against a vertical wall or another low-sloped roof plane) are especially vulnerable. Without a steep gravity assist, standing water and slush accumulate, overwhelming standard roofing underlayments. Technical guidelines like the Roof Valleys and Penetrations Sealed standards emphasize that self-adhering waterproofing membranes and proper metal flashing integration are mandatory to withstand these environmental loads.
Open vs Closed-Cut vs Woven Roof Valleys
Roof valleys are constructed using one of three primary design styles: open metal valleys, closed-cut valleys, or woven valleys. Each system manages water shedding differently, leading to vast differences in long-term reliability and lifespan.
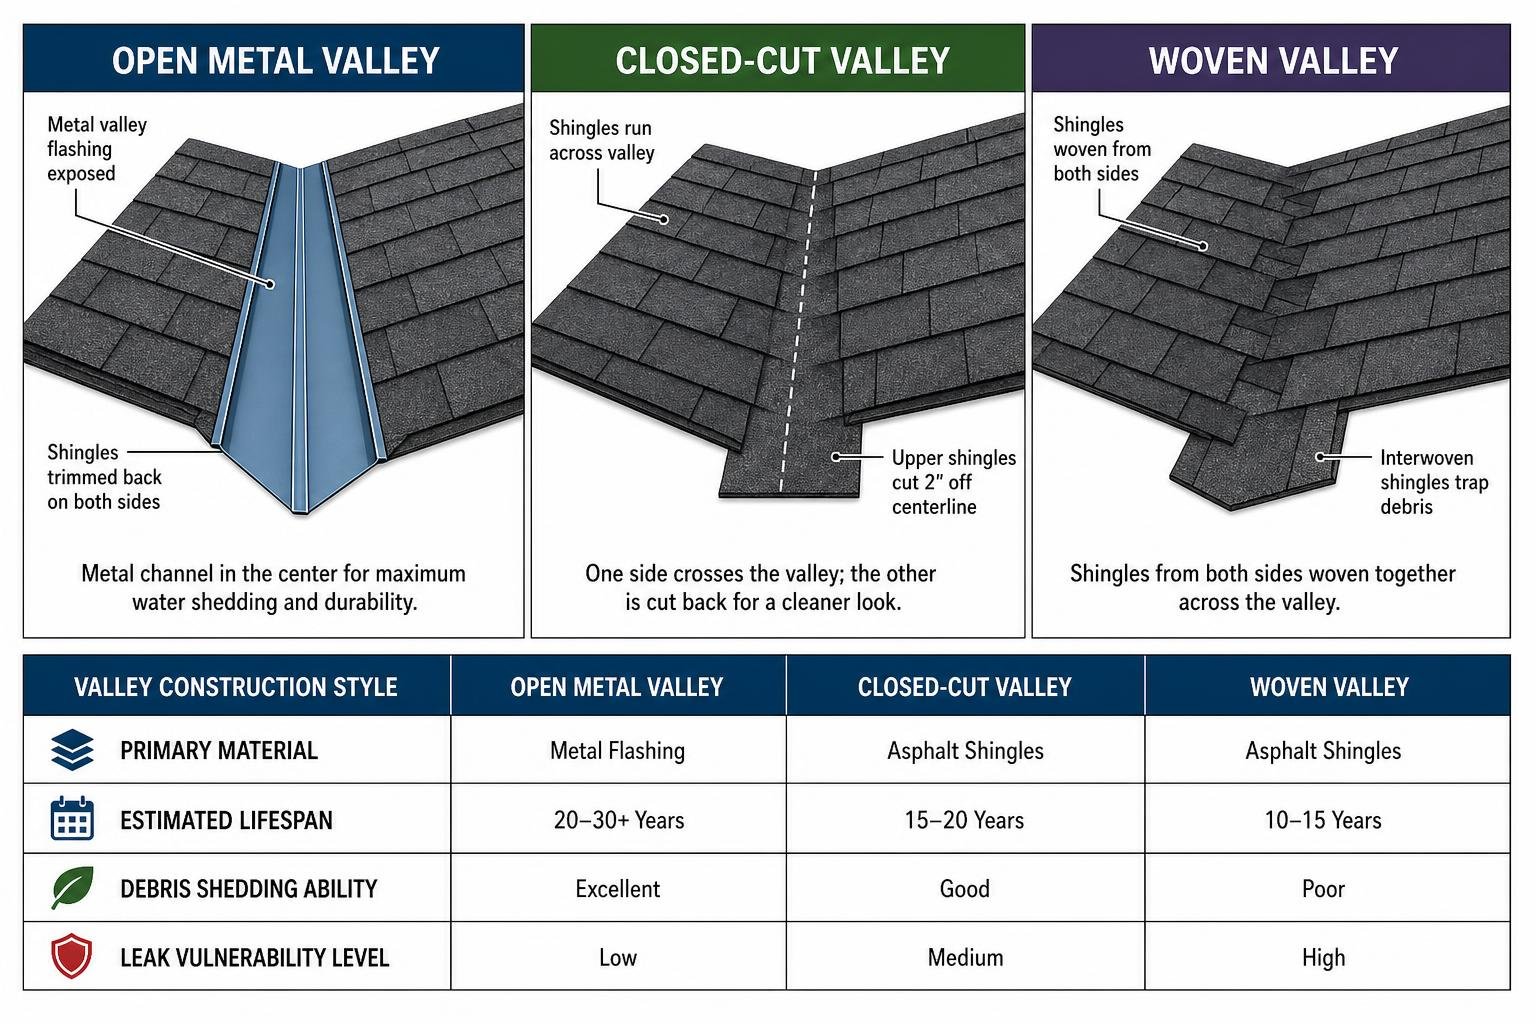
- Open Metal Valleys: Heavy-gauge metal flashing (typically pre-finished steel, aluminum, or copper) is installed directly in the valley center, left visible and exposed to the elements. Shingles are trimmed back several inches on either side of the metal channel. Open valleys shed water and debris smoothly, possess the highest resistance to ice dams, and last 20 to 30 years or more.
- Closed-Cut Valleys: Shingles from one roof plane are run continuously across the valley line onto the adjacent slope. Shingles from the opposite slope are then laid over top and cut along a straight line 2 inches off the valley centerline. Closed-cut valleys look uniform, but if the upper shingle corners are not properly clipped, water can back up beneath the layers.
- Woven Valleys: Shingles from both adjoining roof slopes are woven together alternately across the valley fold. While popular decades ago due to lower installation costs, woven valleys trap leaves and organic debris within the shingle folds. They are notoriously leak-prone in heavy freeze-thaw zones and feature a short lifespan of only 10 to 15 years.
| Valley Construction Style | Primary Material | Estimated Lifespan | Debris Shedding Ability | Leak Vulnerability Level |
|---|---|---|---|---|
| Open Valley | Exposed Sheet Metal (Steel/Copper/Aluminum) | 20–30+ Years | Superior | Lowest |
| Closed-Cut Valley | Overlapped & Trimmed Asphalt Shingles | 15–20 Years | Moderate | Moderate |
| Woven Valley | Interwoven Asphalt Shingles | 10–15 Years | Poor (Traps Debris) | Highest |
At Adept Construction, Inc., we overwhelmingly recommend open metal valleys for homes throughout Northern Illinois. The exposed metal channel handles high water volume and shedding ice effortlessly, providing unmatched durability against aggressive weather.
Why Roof Valleys Are Prone to Leaking
Understanding why roof valleys fail requires looking closely at how they are constructed. Because valleys collect the highest volume of water on the entire roof deck, even minuscule installation flaws quickly translate into active water infiltration.
The leading structural cause of valley leaks is improper nail placement. Roofing fasteners must never be driven within 6 to 10 inches of the valley centerline. When inexperienced installers place nails too close to the center seam, high-velocity water flowing down the channel runs directly over the nail heads, eroding the sealant and creating direct moisture entry points into the roof deck.
Another major culprit is capillary wicking from unclipped shingle corners. In closed-cut valleys, if installer crews forget to clip the top corner of each trimmed shingle at a precise 45-degree angle, flowing water hits the straight edge, turns sideways, and wicks laterally beneath the shingle layer.
Additionally, missing or inadequate ice and water shield underlayment leaves the wood decking unprotected when ice dams back up under shingles during cold winter snaps. Combined with leaf accumulation that holds damp organic matter against shingle granules, these factors accelerate valley deterioration faster than almost any other area on a home.
How to Identify and Diagnose a Leaking Roof Valley
Detecting a roof valley leak early saves thousands of dollars in structural structural repairs. However, pinpointing the actual entry point requires systematically tracing how water moves through a home’s structure.
Water rarely travels straight down through a building. When water breaches a roof valley, it flows along the top of the ice and water shield or underlayment, seeps onto the plywood decking, and hits the nearest wood rafter. From there, gravity pulls it along the sloped rafter until it meets a obstruction—such as a drywall seam, a light fixture, or a ceiling joist—where it finally drips onto the ceiling drywall.
If water is actively collecting on a sagging drywall ceiling, take immediate action to prevent catastrophic ceiling collapse: place a bucket beneath the bulge and carefully puncture a small hole in the center of the wet drywall using a screwdriver to safely release the trapped water weight. For a comprehensive walkthrough on tracing water intrusion throughout your home, check out our Roof Leak Detection Complete Guide.
Exterior and Interior Signs of Valley Failure
Identifying a failing roof valley requires inspecting both the outside roof surface and your interior living space. Keep an eye out for these visual warning signs:
- Rusted, Buckled, or Cracked Metal Flashing: On open valleys, visible rust, pinhole corrosion, or loose metal seams indicate flashing failure.
- Cracked, Lifted, or Missing Valley Shingles: Granule loss, curling edges, or broken shingle tabs along the valley line expose raw underlayment to sunlight and rain.
- Accumulated Debris Lines: Thick build-ups of oak leaves, pine needles, or dirt lodged along the valley seam trap moisture against the shingles.
- Water Stains on Ceilings and Exterior Walls: Yellowish-brown rings on ceilings, ceiling corners, or upper exterior wall drywall indicate hidden leaks.
- Attic Rafter Water Trails: Discolored wood, damp insulation, or white mineral deposits running along rafters in the attic space directly underneath valley intersections.
Pinpointing Hidden Leaks with Attic Inspections and Water Testing
When a ceiling stain appears but the roof surface looks intact, a systematic diagnosis must be performed to isolate the exact entry point.
First, conduct an attic inspection during a heavy rainstorm or shortly thereafter. Head into your attic space with a bright flashlight, staying safely on structural joists. Look upward at the underside of the roof deck along the V-shaped valley line. Examine rafters for damp wood, rot, or rusting nails protruding through the plywood. A digital moisture meter pressed into suspect plywood decking can reveal hidden moisture before visible mold or rot takes hold.
If natural rainfall diagnosis proves inconclusive, perform a controlled water hose spray test. This requires a two-person team: one person stands on the roof with a garden hose while a second person monitors the attic space with a flashlight and phone communication.
Start spraying water at the very bottom of the valley near the eaves for 5 to 10 minutes, keeping the stream low and direct. Slowly move the hose upward along the valley line in 3-foot increments. The instant the attic observer spots water entry, stop moving up—you have successfully pinpointed the exact elevation of the failure point.
Step-by-Step Roof Valley Leak Repair Instructions
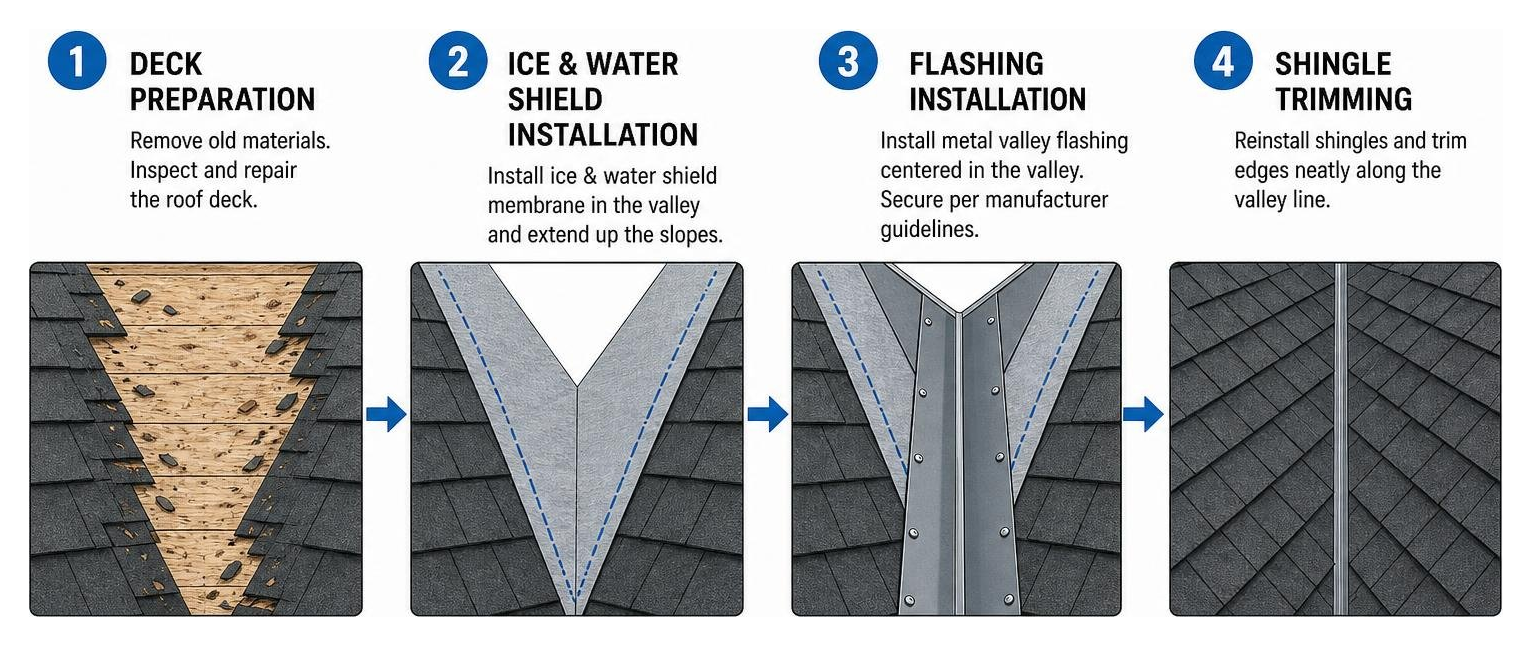
Performing a permanent roof valley leak repair is not a matter of slapping roofing caulk over damaged shingles. Surface patches fail rapidly under thermal stress. A true repair requires expanding the repair zone—stripping back shingles at least 36 inches on either side of the valley centerline, evaluating the exposed deck, installing proper waterproofing membranes, and re-shingling correctly.
Essential Tools and Materials for Roof Valley Repair
Before beginning a roof valley repair project, ensure you have all professional-grade safety gear, tools, and replacement materials on site:
- Safety Harness & Roof Anchor: OSHA-compliant fall protection system.
- Flat Pry Bar (Roofing Shingle Remover): For lifting and removing shingles without tearing undamaged surrounding courses.
- Utility Knife & Heavy-Duty Blades: For trimming tough asphalt shingles and membrane rolls.
- Self-Adhering Ice and Water Shield: Rubberized asphalt membrane (minimum 36-inch width roll).
- 26-Gauge W-Style Metal Valley Flashing: Pre-bent galvanized steel, aluminum, or copper flashing.
- Asphalt Roofing Cement (Plastic Roof Cement): For sealing shingle overlap edges.
- Corrosion-Resistant Roofing Nails: 1.25-inch or 1.5-inch galvanized ring-shank nails.
- Chalk Line & Stiff-Bristle Broom: For layout alignment and deck cleaning.
Executing Permanent Roof Valley Leak Repair
Follow these step-by-step instructions to rebuild a leaking roof valley back to factory-watertight standards:
- Establish Roof Safety and Clear the Work Zone: Secure your safety harness anchor at the roof ridge. Carefully inspect the valley surface and clear away leaves, moss, and dirt using a stiff broom.
- Remove Surrounding Shingles (36-Inch Rule): Using your flat pry bar, carefully pop nails out of the shingles running along the valley. Remove all shingles at least 36 inches (3 feet) outward from the valley centerline on both sides. Work from top to bottom, stripping back to clean bare decking.
- Inspect and Repair the Plywood Roof Deck: Examine the exposed plywood or OSB deck sheathing for soft spots, delamination, or wood rot. Cut out all rotted or water-damaged decking back to the center of adjacent rafters and nail in fresh, matching-thickness exterior plywood.
- Apply Self-Adhering Ice and Water Shield: Clean dust and loose debris from the wood deck. Unroll the self-adhering ice and water membrane, centering it directly over the valley crease line. Peel off the protective backing from bottom to top, pressing the membrane flat with a roller to prevent wrinkles. Ensure it extends at least 24 to 36 inches up each slope. If joining multiple membrane strips, overlap upper sheets over lower sheets by at least 6 inches.
- Install Metal Valley Flashing: Lay 10-foot sections of pre-bent W-style metal valley flashing into the crease, starting from the bottom roof eave working upward. Secure the outer edges of the metal flashing using galvanized roofing nails placed within 1 inch of the outer metal flange edge. Never drive nails near the center water channel. Overlap upper flashing pieces over lower pieces by 6 to 8 inches, applying a thick bead of asphalt roofing cement between the overlapping metal joints.
- Reinstall Matching Shingles with Proper Clearance: Re-lay new shingles overlapping the valley metal. Use a chalk line to mark a straight cut line down the length of the valley, tapering slightly wider at the bottom (e.g., 6 inches wide at top, 8 inches wide at the bottom eave) to handle expanding water runoff volume. Snap a line and trim shingle edges straight with a utility knife.
- Clip Corners and Seal Shingle Edges: Cut the top corner of every single valley shingle at a 45-degree angle to prevent capillary water attraction. Apply a continuous 3-inch band of asphalt roofing cement under the cut edge of each shingle along the metal flashing border, pressing firm into place. Ensure all fasteners remain 6 to 10 inches back from the centerline. For detailed insight into matching asphalt materials properly, refer to our Asphalt Roof Leak Repair Ultimate Guide.
- Conduct Water Flow Sign-Off Test: Allow sealants to cure according to manufacturer instructions, then run a hose test to verify smooth drainage before removing fall protection equipment.
Temporary Measures, DIY Risks, and Professional Repair Costs
When active leaks happen in the middle of a torrential downpour, executing a full reconstruction immediately may not be realistic. Understanding temporary emergency fixes—and recognizing when to switch to professional restoration—prevents escalating property damage.
Emergency Temporary Roof Valley Leak Repair Methods
Temporary repairs buy valuable time until weather permits a permanent fix. However, keep in mind that temporary repairs using plastic roofing cement, caulk, or tarps typically last only 6 to 18 months. Direct sunlight UV exposure, thermal expansion, and Midwest winds rapidly breakdown superficial patches.
- Emergency Roof Tarping: The safest temporary fix involves stretching a heavy-duty woven plastic tarp down the length of the valley. Extend the tarp over the roof ridge line by at least 2 feet to prevent water from running underneath the top edge, and secure the sides down onto the roof surface using 2×4 lumber strips nailed through the tarp into structural rafters.
- Targeted Application of Plastic Roof Cement: If a tiny visible split or pinhole exists in open metal valley flashing, clean the metal with a wire brush and apply a thick layer of rubberized plastic roofing cement using a putty knife. Press a patch of woven fiberglass mesh fabric into the cement, then smooth a second coat over top.
Never rely on caulk patches long-term. Caulk traps standing water behind shingle edges, creating internal dams that force water deep into hidden ceiling cavities.
DIY vs Professional Repair and Cost Breakdown
Attempting a DIY roof valley leak repair presents significant personal safety risks and technical challenges. Roof valleys sit on steep slope intersections where footing is slick and fall hazards are high. Furthermore, improper DIY nailing or misaligned underlayment often worsens the leak.
Understanding potential cost projections helps you evaluate whether to tackle a project or hire expert specialists:
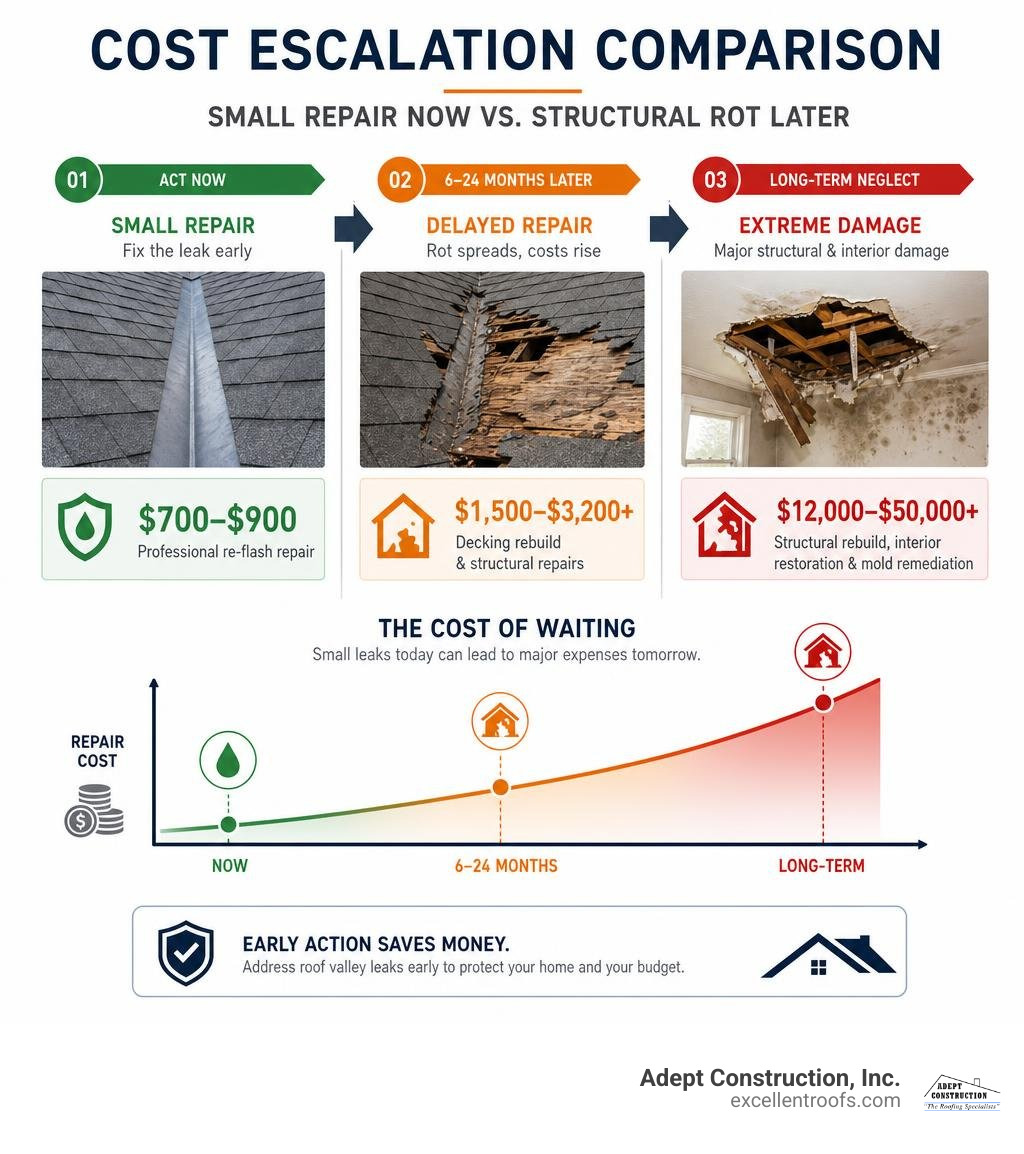
- Standard Professional Re-Flash Repair: $700 to $900. Involves removing shingles 3 feet out, laying fresh ice/water membrane, installing new metal flashing, and re-shingling.
- Delayed Repair with Decking Rebuild: $1,500 to $3,200+. Required when neglected leaks rot underlying plywood deck sheathing and structural rafter edges over a 12 to 24 month period.
- Extreme Structural & Interior Damage: $12,000 to $50,000+. The cost of long-term neglect leading to collapsed ceiling drywall, widespread attic mold remediation, framing replacement, and whole-house restoration.
When evaluating repair options, read through our detailed breakdown on Everything You Need to Know About Leaking Roof Repair Costs. For homeowners located in local suburban communities, our certified teams provide dedicated local service including expert roof repair in Downers Grove and reliable Naperville roof repair services.
Preventing Future Roof Valley Leaks Through Maintenance
The most effective way to eliminate valley leaks is through proactive maintenance. By taking simple preventive steps twice a year, you can extend your roof valley’s lifespan to 25+ years without experiencing emergency interior leaks.
- Perform Bi-Annual Inspections: Inspect your roof valleys every spring and autumn. Use binoculars from the ground or hire a professional to check for lifted shingle edges, rusted metal, or loose sealant.
- Clear Organic Debris Promptly: Leaves, oak tassels, twigs, and dirt collect in roof valleys, creating spongy dams that hold water against asphalt shingles. Use a soft broom or telescopic roof rake to sweep valleys clear before winter snows arrive.
- Maintain Clean Gutters and Downspouts: Clogged gutters cause rainwater to back up into the lower mouth of the roof valley during downpours, lifting lower shingle courses. Keep eave gutters thoroughly clean.
- Ensure Proper Attic Ventilation: Valleys are notoriously difficult to ventilate properly. Poor attic ventilation creates localized heat pockets that melt snowpack on the upper roof plane, which then flows into freezing lower valleys and creates destructive ice dams.
- Inspect After Major Freeze-Thaw Events: In cold weather zones like our Downers Grove service area, check your attic space after winter periods featuring 40+ freeze-thaw thermal cycles to catch minor moisture seepage before rot begins.
Frequently Asked Questions About Roof Valley Leaks
How long does a temporary roof valley repair last?
A temporary roof valley repair using plastic roofing cement, caulk, or an emergency tarp lasts between 6 to 18 months. Direct solar UV rays degrade roofing sealants, while freeze-thaw temperature fluctuations cause metal flashing and shingles to expand and contract, opening up temporary patches. Temporary patches should only be used as a short-term emergency measure until permanent structural repairs can be scheduled.
Does homeowners insurance cover roof valley leak repairs?
Homeowners insurance typically covers roof valley leak repairs if the damage stems from a sudden, accidental covered event—such as a fallen tree branch breaking flashing or severe storm hail pounding open metal valleys. However, insurance policies universally exclude damage caused by normal wear and tear, age-related degradation, or deferred maintenance (such as failing to clean accumulated leaf debris or ignoring long-term leaks).
Why are roofing nails prohibited near the valley centerline?
Roofing nails are prohibited within 6 to 10 inches of the valley centerline because the valley channel handles higher water volume and velocity than any other area on the roof. Fasteners driven close to the center seam create direct holes through the waterproofing layers. Over time, high-speed water running down the valley flows over these nail heads, eroding sealants, rusting nails out, and creating direct water entry paths into the underlying plywood deck.
Conclusion
A leaking roof valley is a serious issue, but it doesn’t have to turn into a financial nightmare. By understanding how valleys manage water drainage, recognizing early signs of failure, and insisting on proper repair procedures—like expanding the repair zone 36 inches and installing heavy-duty ice and water membrane—you can protect your home’s value and structural integrity for decades to come.
At Adept Construction, Inc., our family-owned business has provided high-quality workmanship, knowledgeable advice, and superior customer service across Northern Illinois for nearly 30 years. Whether you need a simple flashing adjustment or a full valley restoration, our expert teams deliver permanent results backed by industry-leading warranties.
Don’t wait for the next heavy storm to turn a small drip into ceiling rot. Contact us today to schedule your free estimate for professional roof repairs and keep your home dry, safe, and fully protected!