Why Log Siding Repair Matters More Than You Think
Log siding repair is essential for maintaining your home’s structural integrity and preventing costly damage that can spiral into thousands of dollars in replacement costs. When moisture infiltrates damaged logs, it creates the perfect breeding ground for rot, mold, and wood-destroying insects that can compromise your entire exterior wall system.
Quick Log Siding Repair Guide:
• Inspect twice yearly for soft spots, dark stains, and hollow sounds when tapped
• Remove all rotted wood before any repair – never cover rot with new siding
• Keep moisture below 19% to prevent further decay
• Choose epoxy repair for minor damage (under 2 inches deep)
• Replace entire logs when more than 50% is compromised
• Address root causes like poor drainage, failed gutters, or inadequate roof overhang
The research shows that most log rot occurs in the lower layers of log walls, especially those closest to the ground or under deck support posts. As one expert puts it: “The best strategy when treating wood rot is to remove the rotted areas” – covering problems only makes them worse.
The stakes are high. Ignoring early warning signs leads to structural damage, expensive full log replacement, and potential safety hazards. But catch issues early, and you can often fix them with simple repairs that cost hundreds instead of thousands.
This guide walks you through everything from spotting trouble early to choosing the right repair method for your situation. You’ll learn when DIY makes sense and when to call professionals, plus how to prevent future problems through proper maintenance.
I’m Gerald Michaels, founder of Adept Construction, Inc., and I’ve been helping Illinois homeowners with log siding repair and exterior maintenance challenges for nearly three decades. My team has seen every type of log damage imaginable, and we’ve learned that the right approach early on saves both money and heartache down the road.

Why Log Siding Fails in the First Place
Think of your log siding like a superhero – it’s pretty tough, but it has a few weaknesses that bad guys (moisture, bugs, and weather) love to exploit. Understanding these vulnerabilities is your first step toward becoming the hero your logs need.
Moisture is the ultimate villain here. When wood moisture content creeps above 19 percent, you’ve basically rolled out the red carpet for fungal growth and rot. This isn’t some random number we picked – it’s backed by decades of research showing that keeping wood below this threshold prevents most decay problems. It’s like a magic line that separates healthy logs from rotting ones.
UV degradation teams up with moisture to create a one-two punch that breaks down wood fibers. Illinois summers can be brutal, and all that sunlight doesn’t just fade your protective stains – it actually dries out the wood surface, creating tiny cracks that become highways for water infiltration. It’s a vicious cycle where UV damage makes moisture problems worse, and moisture makes UV damage spread faster.
Insects are often the cleanup crew that shows up after moisture has already weakened your logs. Carpenter ants and termites are like opportunistic thieves – they target wood that’s already compromised by moisture and decay. Once they move in, they create tunnels and galleries that turn your solid logs into Swiss cheese, providing even more pathways for water to sneak in.
Here’s something many homeowners don’t realize: poor roof overhang is one of the sneakiest causes of log siding repair problems. Your roof should act like an umbrella for your logs, but if those eaves are too short or poorly designed, your siding gets hammered by every rainstorm and snowfall. We see this constantly in our roofing work around Downers Grove – homes with inadequate overhangs always have more siding issues.
Snow load and freeze-thaw cycles add another layer of stress to your log siding system. In Illinois, we get hit with ice dams and heavy snow accumulation that can literally push against your siding while simultaneously driving moisture deep into the wood fibers. When that moisture freezes and expands, it’s like having tiny jackhammers working inside your logs.
Inadequate ventilation around log walls is like holding your breath underwater – eventually, something’s got to give. Logs need to breathe and dry out between weather events, but when air can’t circulate properly, they stay damp for extended periods. This creates the perfect environment for all those other problems to take hold.
The 6 Most Common Culprits
Ground splash is the number one troublemaker we encounter. When rain hits concrete driveways, patios, or packed soil, it bounces back up like a mini geyser, carrying dirt and debris that stick to your lower logs. This creates a constantly damp, nutrient-rich environment where mold and mildew throw their own little party at your expense.
Leaking gutters are like having a garden hose pointed at your siding 24/7. We’ve seen entire log sections completely destroyed by a single failed gutter joint that directed water against the same spot for months. The concentrated water flow overwhelms even the most rot-resistant wood species, creating log siding repair emergencies that could have been prevented with simple gutter maintenance.
Unchecked cracks in your logs act like tiny funnels, directing water straight into the heart of the wood where it can’t easily escape. These cracks often start as hairline splits from normal wood movement, but Illinois freeze-thaw cycles turn them into major moisture highways. What starts as a cosmetic issue becomes a structural problem faster than you’d expect.
Plant growth too close to your log walls might look beautiful, but it’s creating a moisture trap that your siding can’t escape. Flower boxes, landscaping, and even tall grass against your logs prevent proper air circulation and create those damp microclimates where fungal growth thrives. Your logs need some breathing room – think of it as social distancing for wood.
Failed stain or protective coatings leave your logs naked against the elements. When these finishes wear off (and they all do eventually), your logs lose their primary defense against both UV damage and moisture penetration. It’s like going outside without sunscreen – you might be fine for a while, but eventually, you’re going to get burned.
Termite activity often flies under the radar until the damage is extensive. Scientific research on termite vs wood rot shows that these destructive insects create protective mud tubes while tunneling through wood. Here’s the kicker – termite presence often indicates underlying moisture problems that made your wood attractive to them in the first place. They’re like the canary in the coal mine, warning you about moisture issues you might not have noticed yet.
Spot Trouble Early: Inspection Tools & Techniques
Catching problems early is like finding a small leak before it becomes a flood – it saves you thousands of dollars and countless headaches. The good news? You don’t need expensive equipment or years of training to spot most log siding repair issues before they become serious.
The tapping test should be your go-to diagnostic tool. Grab a hammer or even the handle of a screwdriver and gently tap along each log. Healthy wood sounds crisp and clear, almost musical. Rotted wood? It sounds dull and hollow, like tapping on cardboard. I’ve taught this technique to hundreds of homeowners, and they’re always amazed at how obvious the difference becomes once they know what to listen for.
Moisture meters take the guesswork out of problem detection. These handheld devices give you exact moisture readings when you press their pins into the wood surface. Think of them as a thermometer for wood health – when readings consistently show above 19%, you’ve got trouble brewing even if everything looks fine on the surface.
For areas that are hard to see or reach, a borescope works like a tiny periscope for your logs. These small cameras can peek inside wall cavities through holes smaller than a pencil. They’re particularly valuable around windows and doors where rot loves to hide behind trim boards.
Chisel probing gives you that hands-on feel for wood condition. A sharp chisel pressed gently against questionable wood will sink right into rotted areas while meeting firm resistance in healthy wood. It’s like the difference between pressing into a ripe peach versus a fresh apple.
When you’re doing your tapping inspection, pay special attention to areas that sound hollow. These hollow sounds often reveal rot pockets hiding beneath surfaces that look perfectly normal. Map out these areas as you go – the pattern often tells a story about where water is getting in.
Carpenter ant holes deserve special attention because these insects are like nature’s early warning system. They rarely bother with perfectly healthy wood, so their presence almost always means you’ve got moisture and decay issues that need immediate attention.
Bi-Annual Log Siding Inspection Checklist
Spring and fall are your inspection sweet spots. Spring reveals what winter threw at your logs, while fall helps you prepare for harsh weather ahead. Think of these inspections like dental checkups – regular prevention beats emergency treatment every time.
Create a simple record sheet for each inspection. Note problem areas, jot down moisture meter readings, and track changes over time. This becomes invaluable documentation if you need to file insurance claims or track the success of your repair efforts.
Photo documentation is your best friend here. Take close-up shots of any questionable spots and wide shots showing the overall condition. Date and location stamps help you organize everything, and the photos often reveal changes that are too gradual to notice day-to-day.
Ladder safety can’t be emphasized enough during these inspections. Use proper three-point contact, have someone spot you, and never overreach to get that one last spot. For high areas or steep sections, it’s worth calling professionals rather than risking a fall.
For comprehensive guidance on maintaining all your exterior components, our maintenance tips cover everything from siding to trim work.
Using Tech to Measure Hidden Moisture
Pin-type moisture meters with insulated electrodes are the gold standard for accurate readings. These tools measure electrical resistance between two points in the wood, giving you precise moisture content numbers that take the guesswork out of problem detection.
Infrared cameras reveal the invisible by detecting temperature differences that often indicate moisture problems. Wet wood shows up cooler than dry wood in thermal images, helping you spot issues that your eyes might miss completely.
The 19 percent rule is your critical action threshold. When wood moisture content climbs above this level, you’ve entered the danger zone where fungi can start their destructive work. Regular monitoring with a good moisture meter helps you catch problems before they become visible damage.
Data logging with advanced meters tracks moisture patterns over time, revealing seasonal trends that single measurements might miss. This information helps you understand whether problems are getting better or worse and validates whether your repair efforts are actually working.
Log Siding Repair Methods Explained

When it comes to log siding repair, there’s no one-size-fits-all solution. The method you choose depends on how bad the damage is, whether the log still provides structural support, and honestly, how much you want to spend. Let me walk you through the main approaches so you can make the right choice for your situation.
Drill-and-fill epoxy repair is your go-to method for damage that hasn’t gone too deep – typically less than 2 inches into the log. Think of it like dental work for your house. You drill holes every 6 inches at different angles (30°, 45°, and 60°) to reach all the rotted wood, then inject penetrating epoxy sealer followed by an epoxy-sawdust mixture. It’s precise work, but it can save logs that might otherwise need complete replacement.
For more serious damage, the rip-dry-treat method lets you keep the original look while fixing deep problems. You carefully remove the outer face of the log, dry out the interior wood with high-powered blowers, treat everything with penetrating epoxy, fill the voids with treated wood and resin, then reattach the original face. It’s like performing surgery while keeping the patient’s good looks intact.
Cedar replacement is the gold standard when rot has really taken hold. You cut out the damaged sections and install new kiln-dried cedar logs. Cedar naturally resists rot, making it perfect for replacement work. This method works for any level of damage, but you need skilled carpentry to get the fit and finish right.
Half-log replacement strikes a balance between cost and effectiveness. Instead of replacing entire logs, you remove just the damaged portion and splice in new wood. This works well when rot affects only part of a log’s length or depth.
Full log replacement becomes necessary when more than 50% of a log is compromised. At that point, trying to save what’s left is like putting a band-aid on a broken arm – it might look better temporarily, but it won’t solve the real problem.
Cost considerations vary widely based on your chosen method and local labor rates. DIY epoxy repairs might run $200-500 in materials for minor damage. Professional half-log replacement typically costs $500-1,500 per section, while full log replacement can range from $1,000-3,000 per log depending on size and how hard it is to reach.
Time frames are just as important as costs when planning your project. Epoxy repairs need 3-4 weeks for complete curing – you can’t rush chemistry. Log replacement moves much faster, often wrapping up in 1-2 days for single logs or 2-5 days when you’re tackling multiple logs.
Epoxy Resin Pros & Cons
Structural consolidation is where epoxy really shines. High-quality penetrating epoxy doesn’t just fill holes – it actually binds wood fibers together and creates a polymer matrix that can make repaired sections stronger than the original wood. It’s pretty amazing chemistry when you think about it.
But curing time can test your patience, especially in cooler weather. Here’s a rule that’s saved me countless headaches: cure time doubles for every 18°F drop below 68°F and halves for every 18°F rise above that temperature. This makes timing absolutely critical for outdoor repairs, particularly here in Illinois where weather can be unpredictable.
Expansion rates present a long-term challenge that many DIYers don’t consider. Epoxy and wood expand and contract at different rates with temperature changes. Quality epoxy formulations minimize this difference, but it’s still something to keep in mind for large repairs that will face years of freeze-thaw cycles.
Aesthetic concerns are real – epoxy doesn’t absorb stain the same way wood does. Even with careful color matching, repairs often remain visible. It’s functional, but it won’t fool anyone looking closely. Some homeowners actually prefer this honesty over trying to hide repair work.
Odor issues during application require proper ventilation and protective equipment. The smell can be pretty intense, especially in enclosed areas. I always warn homeowners about this ahead of time – nobody wants surprise chemical odors in their living space.
The scientific research on epoxy cure provides fascinating details about temperature effects and optimal application conditions for wood consolidation projects. It’s technical reading, but worth it if you’re planning major epoxy work.
Why “Just Cover It With New Siding” Is a Bad Idea
I see this approach suggested way too often, and it breaks my heart every time. Appearance mismatch is just the beginning of your problems when you cover log rot with new siding. You end up with thickness variations and visual inconsistencies that scream “something’s wrong here” to anyone who looks closely.
But the real issue is trapped rot that continues spreading beneath your shiny new siding. It’s like putting makeup over a rash – you might hide the symptoms, but the underlying problem keeps getting worse. The rotted wood continues providing food for insects while weakening your home’s structure, all hidden from view.
Insect problems don’t magically disappear when you cover them up. Carpenter ants and termites will keep munching on that rotted wood beneath your new siding, potentially spreading to previously healthy areas. You’ve essentially given them a private dining room with a roof over their heads.
Moisture cycling issues persist because you haven’t addressed what caused the rot in the first place. The same drainage problems, failed gutters, or inadequate roof protection that created the original damage will attack your new siding too. You’ll face premature failure of your “repair” while the hidden problems continue growing.
Professional restoration experts are unanimous on this point. This external guide against covering rot explains in detail why covering rot creates more problems than it solves. It’s a short-term cosmetic fix that leads to long-term structural and financial nightmares.
Take it from someone who’s seen the aftermath of these “quick fixes” – do the job right the first time. Your future self will thank you, and your wallet will too.
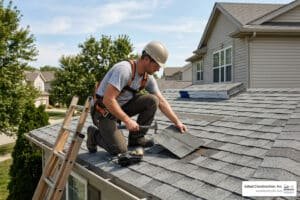
Step-by-Step DIY Log Siding Repair

Taking on a DIY log siding repair project can save you thousands of dollars, but it requires patience, proper preparation, and respect for safety protocols. I’ve watched too many well-intentioned homeowners turn minor repairs into major problems by rushing the process or skipping crucial steps.
Before you pick up that first tool, gather your PPE gear and take safety seriously. You’ll need safety glasses to protect against wood chips and chemical splashes, dust masks for sawdust and mold spores, work gloves for handling rough wood and chemicals, and long sleeves to protect your skin. When working with epoxy products, add extra ventilation and consider upgrading to a respirator – those fumes aren’t something you want to breathe.
Safety prep goes beyond personal protection. Secure your ladders properly using the 4-to-1 rule (for every 4 feet of height, the base should be 1 foot from the wall), clear your work area of trip hazards, and always have someone nearby when working at height. Weather matters too – wet conditions make everything slippery and dangerous, while high winds can turn tools into projectiles.
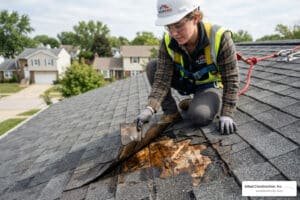
Now comes the critical first step: cutting out all the rot. This is where many DIYers go wrong by being too conservative. Make your vertical cuts well beyond the visible damage, extending them to the full depth of the rot. Use a sharp chisel to methodically remove every bit of soft, discolored, or questionable wood until you hit solid material that sounds crisp when tapped. Any rot left behind will continue spreading and compromise your entire repair.
Borate treatment with products like Shellguard RTU is your insurance policy against future problems. Think of it as creating a chemical barrier that fungi and insects can’t cross. Apply it generously to all exposed wood surfaces, including the healthy wood around your repair area. Then comes the hardest part for most homeowners – waiting 3 to 5 days for complete drying before moving forward.
Drying the logs thoroughly is absolutely critical for repair success. Moisture content must drop below 19% for optimal bonding with epoxy or proper installation of replacement wood. Use fans, dehumidifiers, or rent commercial blow-dryers if needed. This step determines whether your repair lasts 20 years or fails in 2.
When fitting new sections, take time to match the existing log profiles as closely as possible. Kiln-dried cedar is your best choice for replacement material because of its natural rot resistance. Test-fit everything before final installation – it’s much easier to make adjustments before the adhesive sets.
Choose galvanized or stainless steel fasteners to prevent the ugly rust stains that plague many log repairs. Combine construction adhesive with mechanical fasteners for maximum holding power and weather resistance. The adhesive fills gaps while the fasteners provide immediate holding strength.
Sanding creates seamless transitions between old and new wood, but don’t rush this step. Start with coarse grits to shape the repair, then progress through finer grits for a smooth finish. The goal is making the repair invisible to both sight and touch.
Stain blending requires an artist’s patience and a scientist’s precision. Test your stain combinations on hidden areas first, and build color gradually with multiple thin coats rather than trying to match everything in one heavy application. The wood will look different wet versus dry, so let each test sample cure completely before judging the color match.
DIY Log Siding Repair Checklist
Making vertical cuts prevents the tear-out that ruins otherwise good wood adjacent to your repair area. Mark your cut lines with a square and use the sharpest tools you have – dull blades cause more problems than they solve.
The 50-percent rule is your decision point between repair and replacement. When more than half of a log’s cross-section is compromised, you’re dealing with structural integrity issues that require complete log replacement rather than patching.
Shellguard RTU and similar borate treatments aren’t optional – they’re essential protection against the organisms that created your problem in the first place. These products penetrate deep into wood fibers and provide decades of protection when applied properly.
Penetrating sealer creates the foundation for everything that follows. Whether you’re applying epoxy fillers or installing replacement wood, this step ensures proper bonding and prevents moisture infiltration that could undermine months of careful work.
Caulking and chinking all gaps with high-quality sealants designed specifically for log construction completes your weather barrier. Use backer rod for gaps larger than 1/4 inch before applying caulk to ensure proper adhesion and flexibility through seasonal movement.
When to Call a Pro for Log Siding Repair
Structural compromise is where DIY enthusiasm needs to meet professional reality. When logs support roof loads or provide lateral stability for your home, improper repairs can create safety hazards and code violations that insurance companies and building inspectors take very seriously.
Multiple log damage often signals systematic problems that need comprehensive solutions rather than individual repairs. Professional contractors can identify and address the underlying causes while coordinating complex repairs that ensure long-term success.
Working at heights over 10 feet creates risks that most homeowners aren’t equipped to handle safely. Professional crews have proper scaffolding, safety equipment, and training for liftd work – the cost of professional help is minimal compared to medical bills or worse.
Time constraints make professional help valuable when repairs must be completed quickly to prevent weather damage or meet project deadlines. What takes a homeowner weeks to complete, experienced crews can often finish in days.
For complex repairs or when your roof system needs attention that could be contributing to your log siding problems, our residential roofing services address the complete building envelope to prevent future moisture issues.
Future-Proofing Your Cabin: Maintenance & Prevention

The best log siding repair is the one you never have to do. Smart prevention strategies cost a fraction of major repairs and keep your cabin looking beautiful for decades. Think of maintenance as insurance – a small investment now prevents big headaches later.
Annual washing might seem like extra work, but it’s one of your most powerful weapons against decay. Use gentle, non-bleach cleaners designed specifically for log homes. The key is removing dirt, mildew, and organic debris that literally feed the organisms trying to eat your logs. Just don’t overdo it – washing every other year is plenty to preserve wood integrity while keeping things clean.
Your logs need sunscreen just like you do. A clear UV topcoat acts as a sacrificial layer that takes the beating from harsh sunlight so your expensive stain doesn’t have to. When you notice the sheen starting to fade, it’s time to reapply – usually every 1-3 years depending on how much sun exposure your walls get.
Caulk checks should become as routine as checking your oil. Walk around your cabin annually looking for gaps and cracks where water could sneak in. High-quality log home caulks stay flexible through our Illinois temperature swings and maintain their grip on wood surfaces. It’s amazing how much damage a tiny gap can cause over time.
Winter brings special challenges for log homes. Snow management means keeping that beautiful white stuff away from your log walls. Piled snow acts like a wet blanket, suffocating your logs and rehydrating protective finishes. The result? Diluted stain that penetrates deep into wood fibers and creates perfect conditions for rot.
Good landscaping clearance gives your logs room to breathe. Keep plants, mulch, and decorative features at least 18 inches away from log walls. Your logs need air circulation to dry out after rain or snow. Beautiful flower boxes right against the cabin might look charming, but they’re creating a moisture trap that will cost you thousands later.
Don’t underestimate the importance of gutter care for log home protection. Clean gutters regularly, fix leaks the moment you spot them, and make sure downspouts carry water well away from your foundation. One failed gutter joint can destroy an entire log section by concentrating water flow against the same spot month after month.
Roof & Drainage Upgrades That Save Your Logs
Your roof is your logs’ best friend when it’s working properly. Flashing around windows, doors, and roof penetrations creates an invisible shield that directs water away from vulnerable joints and seams. When flashing fails, water finds its way behind log siding where it can cause massive damage before you even know there’s a problem.
Wider eaves provide better protection for log walls than standard roof overhangs. If you’re planning a re-roofing project, consider extending those overhangs to give your logs extra protection from wind-driven rain and snow. It’s much cheaper to add overhang during roof replacement than to repair rotted logs later.
Downspout extensions might not look fancy, but they’re crucial for preventing ground splash damage to lower logs. Use buried drain lines or splash blocks to carry roof drainage well away from your cabin’s foundation. The goal is keeping that water from bouncing back up onto your logs.
Illinois winters can be brutal, and ice dam barriers protect against moisture problems that are all too common in our climate. These membranes prevent ice-melted water from backing up under roofing materials and finding its way into log walls. Trust me, dealing with ice dam prevention is much easier than fixing water damage after the fact.
At Adept Construction, our roof repair services in Downers Grove specifically address weather protection needs for log homes. We understand how critical proper roofing is for protecting your log siding investment.
Best-in-Class Coatings & Treatments
Borate preservatives are like vitamins for your logs – they provide long-term protection against insects and decay organisms from the inside out. These treatments penetrate deep into wood fibers and keep working for years when properly applied. Think of them as an invisible force field against the bugs and fungi that want to make your logs their home.
Semi-transparent stain strikes the perfect balance between protection and natural beauty. You can still see the gorgeous wood grain underneath while getting solid UV and moisture protection. Yes, it requires more frequent maintenance than solid stains, but most log home owners agree the natural appearance is worth the extra effort.
Here’s a pro tip: apply a clear UV sacrificial coat over your colored stain. This clear coating takes the punishment from sun and weather while protecting your expensive base coat underneath. Think of it as expendable armor that you replace regularly to keep the important stuff safe.
Recoat cycles vary dramatically based on your specific conditions. Transparent finishes in full sun might need attention every 1-2 years, while semi-solid stains in protected areas can go 5-7 years between coats. The key is establishing a maintenance schedule based on your actual exposure conditions rather than following generic recommendations.
Every dollar spent on prevention saves you ten dollars in log siding repair costs down the road. Your cabin is an investment worth protecting with proper maintenance and smart upgrades.
Frequently Asked Questions about Log Siding Repair
How often should I inspect and re-seal my log siding?
Twice-yearly inspections are your best defense against expensive log siding repair projects. Schedule these for spring and fall – spring reveals any winter damage while giving you time for repairs before summer, and fall preparation helps identify issues before harsh weather makes them worse.
The timing isn’t arbitrary. Logs naturally shrink and expand with temperature and humidity changes, creating stress points where problems develop. Regular inspection catches these issues when they’re still manageable and affordable to fix.
Re-sealing schedules depend heavily on your specific conditions and finish type. Transparent finishes typically need attention every 1-3 years because they provide minimal UV protection. Semi-transparent stains last longer – usually 3-5 years in protected areas, but only 2-3 years on south-facing walls that get heavy sun exposure.
The best indicator is watching your clear UV topcoat’s sheen. When that protective gloss disappears, it’s time to reapply regardless of the calendar. This sacrificial layer protects your expensive base stain, so don’t let it fail completely.
When is a full log replacement necessary instead of epoxy?
The 50 percent rule is your decision point – when more than half the log’s cross-section shows rot or structural damage, replacement becomes necessary. At this point, even excellent epoxy work can’t restore adequate structural integrity.
Structural support logs require immediate replacement when compromised, regardless of damage percentage. These logs carry roof loads or provide lateral stability for your home, making safety the top priority over repair costs.
Consider replacement when you’re dealing with multiple damaged logs in the same area. This usually indicates systematic problems like failed gutters or inadequate roof protection that have created widespread damage. Addressing the whole problem at once often costs less than repeated individual repairs.
Previous epoxy failures also signal the need for replacement. If quality epoxy work didn’t hold, the underlying conditions are too severe for repair methods to succeed long-term.
Does climate in Illinois change my maintenance schedule?
Illinois weather absolutely affects your maintenance timing and frequency. Our freeze-thaw cycles are particularly hard on log siding, accelerating crack development and driving moisture deep into wood fibers.
Never wash logs during winter months – this is critical in our climate. Water can freeze in cracks and joints, causing expansion damage that creates bigger problems come spring. Schedule washing for late spring or early fall when temperatures stay consistently above freezing.
Our humidity levels also extend drying times for treatments and finishes. Plan extra cure time during humid summer periods, and consider using fans or dehumidifiers to speed the process. This is especially important for epoxy repairs, which can take twice as long to cure in high humidity.
Spring maintenance becomes more urgent here because winter damage can worsen quickly once temperatures rise and moisture increases. The good news is that our roofing expertise at Adept Construction includes understanding how Illinois weather affects all exterior building components, including log siding protection through proper roof design and maintenance.
Conclusion & Next Steps
Your journey to successful log siding repair starts with understanding one simple truth: small problems caught early save thousands of dollars and countless headaches down the road. Think of it like visiting the dentist – nobody enjoys it, but catching a small cavity beats root canal surgery every time.
The fundamentals we’ve covered aren’t rocket science, but they make all the difference. Keep wood moisture below 19% to starve out rot-causing fungi. Remove all damaged wood before repairs because covering problems only feeds them. Address the root causes like poor drainage or failing gutters that created the mess in the first place. Choose appropriate repair methods based on damage extent, not wishful thinking. Maintain regular inspection schedules because your logs can’t text you when they’re in trouble.
At Adept Construction, Inc., we’ve walked alongside countless Illinois homeowners through both emergency repairs and planned maintenance programs. As a family-owned business, we get it – your home isn’t just a financial investment, it’s where your family creates memories and finds safety.
Sometimes the best investment is professional guidance, especially when structural integrity comes into question. Our experienced crews serve the Downers Grove and Naperville areas with the kind of honest assessment that comes from decades in the business. We’ll tell you when DIY makes sense and when it’s time to call in reinforcements.
The beautiful thing about log siding repair is that most problems give you plenty of warning before they become emergencies. Those soft spots, discolored areas, and hollow sounds during your tapping tests are your logs asking for help – not demanding immediate surgery.
Don’t let minor issues snowball into major structural problems that threaten your home’s integrity and your family’s budget. Whether you need emergency repairs, preventive maintenance guidance, or comprehensive exterior protection through professional roofing services, we’re here to help you make smart decisions.
Contact us today for a free inspection and consultation. We’ll assess your specific situation honestly, explain your options clearly, and provide recommendations that protect both your home and your peace of mind. For comprehensive siding services backed by superior customer service and quality workmanship, Adept Construction, Inc. has earned the trust of homeowners throughout Illinois.
Your logs have sheltered your family faithfully – now it’s time to return the favor with the care and attention they deserve.