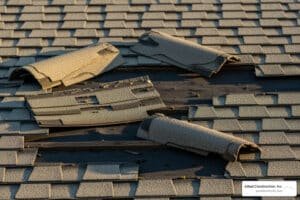
Why Proper Roof Edge Detailing is Critical During Roof Replacement
The roof-to-fascia interface—not the gutter itself—is what keeps water out of your home. When replacing or repairing a roof, a licensed roofer must verify the eaves, drip edge, and underlayment so runoff flows properly away from your fascia and walls. As a trusted Downers Grove roofing contractor, Adept Construction, Inc. prioritizes roof-edge detailing that protects your sheathing, soffits, and foundation in every season.
To ensure proper water management during roof replacement, follow this roof-edge checklist:
- Inspect decking and fascia: Replace any rotted sub-fascia or delaminated sheathing before installing new roofing materials.
- Install ice-and-water shield: Extend self-adhered underlayment from the eave up the roof deck to create a watertight barrier against wind-driven rain and ice dams.
- Add aluminum drip edge: Install eave metal from low to high, overlapping joints 2 inches and fastening on the deck. Drip edge helps control runoff and is required by modern building codes.
- Set the starter course: Align the starter strip and first shingle course so water flows properly off the roof edge.
- Integrate apron flashing: Install flashing to prevent water from running behind the fascia and causing rot.
- Verify kick-out flashing at roof-to-wall intersections so water exits cleanly rather than behind the siding.
- Water-test the eave after installation to confirm positive flow and no backflow behind the metal or shingles.
A well-detailed roof edge directs rainwater away from your roof, siding, and foundation, preventing costly issues like basement flooding and soil erosion that can compromise your home’s overall integrity. Aluminum drip edge is favored at the eaves for its durability, affordability, and rust resistance, and it integrates cleanly with shingle systems when installed by a qualified roofer.
While many homeowners focus solely on visible roofing materials, the details at the eave are what determine long-term performance. Understanding the process helps you hire the right team for your residential roofing project. For local context, explore our comprehensive guide on roof replacement in Downers Grove.
With nearly three decades of experience, Gerald Michaels, founder of Adept Construction, Inc., ensures every roof-edge system is built to channel water cleanly away from the home and protect the structure for the long term.

Planning Your Roof Edge Protection System
Proper planning starts with the roof edge. Your roof replacement or repair project will only perform as intended if the eaves, underlayments, and metals are installed to roofing standards.
Why Choose Aluminum for Roof Edge Components?
From the roofing perspective, aluminum is the preferred eave metal (drip edge and apron flashing) because it is:
- Cost-effective and widely available in matching colors for trim continuity.
- Rust-resistant, forming a protective oxide layer in rain, snow, and ice.
- Lightweight, enabling secure fastening without overloading the fascia.
- Durable when paired with quality underlayment, lasting as long as the shingle system.
The main vulnerability is denting from impacts (e.g., falling branches), but at the eaves, aluminum’s corrosion resistance and formability make it ideal for drip-edge and apron flashing.
Understanding Roof Edge Water Management
Whether you have a simple gable roof or complex hip design, the roofing work remains consistent: properly installed drip edge, underlayment, and starter shingles are mandatory. Modern roofing systems require multiple layers of protection to ensure water flows away from vulnerable areas. At Adept Construction, Inc., we prioritize the roof system’s long-term health through proper edge detailing. For additional context on roofing systems, see our article on shingle roofing.
Essential Tools and Materials for Roof Edge Installation
For the roofing scope at the eave, you’ll need:
- Roof-Edge Components: Aluminum drip edge, apron flashing, starter strip, shingles, ice-and-water shield, and underlayment.
- Fasteners and Sealants: Roofing nails, approved roofing sealant/roof cement for laps at corners and penetrations.
- Cutting and Measuring Tools: Measuring tape, 4-foot level, chalk line, tin snips or metal shears, and a utility knife.
- Power Tools: A coil nailer or hammer, and a drill/driver for flashing and trim work.
- Safety Gear: A sturdy ladder, safety glasses, and work gloves are non-negotiable.
For a complete, detailed list of helpful roofing tools, check out this comprehensive tool list for your project. With the right preparation and a roof-first plan, your eaves will protect your home for years and align with best practices for shingle systems.
A Step-by-Step Guide to Roof Edge Installation
With your plan in place, focus on the roofing work that ensures proper water management. Always prioritize safety: use a sturdy ladder, wear safety glasses and gloves, and work with a helper if possible.
Step 1: Measure, Plan, and Establish the Roof Edge
A correct roof edge installation is critical for water management and overall roof performance.
- Map the eaves and check rafter tails: Confirm straight, sound nailing for metals and starter shingles. Replace damaged fascia/sub-fascia before any new components.
- Define eave protection: Mark how far ice-and-water shield will extend from the eave up the deck and where underlayment overlaps will land.
- Coordinate the drip edge: The drip edge must be positioned to guide water away from the fascia while preventing ice from creeping behind the system in winter.

Step 2: Install Roof Edge Components
Install the roof-edge components that actually keep water out.
- Install ice-and-water shield at the eave and lap underlayment properly up-slope.
- Cut and set aluminum drip edge from low to high, overlapping joints and fastening on the deck, not the fascia. Embed laps in a thin bead of approved roofing sealant.
- Set the starter strip and first course so the shingle edge projects cleanly for proper water runoff.
- At roof-to-wall areas, add kick-out flashing so runoff is diverted away from the siding.

The most common mistake is skipping roof-edge waterproofing. Every outside and inside corner of drip edge and apron flashing needs proper overlap, bedding in sealant, and tight fastening.
Step 3: Complete Roof Edge System and Test
Final checks ensure the roofing work functions correctly.
- Confirm eave alignment: The shingle edge should be positioned for optimal water runoff, with drip edge guiding water away from the fascia.
- Verify flashing: Tuck metal flashing under your roof shingles to prevent water from running behind and rotting the fascia. If you find existing fascia damage, it may signal a need for roof repair in Downers Grove, IL, as it can affect your entire residential roofing system.
- Secure attachments thoughtfully: Ensure all fasteners are driven into solid framing and do not compromise drip edge or underlayment.
- Direct water away: Ensure proper water management directs runoff at least 4-6 feet from the foundation to protect the structure and soils.
- Test the assembly: Run a garden hose along the eave to confirm positive flow and no backflow behind metals or shingles.
Maintenance and Advanced Roofing Considerations
Your roof-edge detailing is complete, but regular checks are key to multi-decade performance.
Protecting Your Roof Edge from Debris
Roof edge protection must be compatible with your roofing system. Some accessories can lift shingles or block drip-edge performance; others integrate cleanly and reduce maintenance.
- Benefits: Quality, low-profile protection systems can reduce debris accumulation that leads to water backing up at the eave and wetting the fascia and soffit.
- Compatibility: Favor systems that do not pry up shingles, that rest below the shingle edge, and that allow drip edge to function.
- Coordination: If you add protection systems, confirm they do not void shingle warranties or interfere with apron flashing.

Long-Term Roof Edge Maintenance
Even with a roof-first approach, periodic roof-edge checks are essential.
- Eave inspection: After heavy rain or freeze-thaw cycles, look for staining behind the drip edge, lifted shingle edges, or loose metals that could channel water where it doesn’t belong.
- Seal integrity: Recheck laps at corners and reapply sealant if needed; verify that apron flashing still tucks cleanly behind the shingles.
- Ventilation and heat: Adequate attic ventilation and insulation reduce ice-dam risk and protect your residential roofing system. For comprehensive roof maintenance, also see our guide on storm damage prevention and repair.
DIY vs. Hiring a Professional for Your Roof Edge Work
If your home is one story with straight eaves and solid fascia, you might handle basic inspection. However, multi-story homes, steep slopes, and roof-to-wall intersections warrant a professional roofer because the details at the eave and sidewalls are building-code-critical. As noted by experts at sources like This Old House, proper integration is key to performance.
For a professional assessment in the Downers Grove or Naperville area, Adept Construction, Inc. inspects the roof edge, installs the correct underlayments and metals, and ensures watertight results for your roofing system.
Frequently Asked Questions about Roof Edge Installation
Here are concise answers Adept Construction, Inc. provides when clients are coordinating roof edge work with roof upgrades.
What is the best way to seal roof-edge metals to prevent leaks?
Use a belt-and-suspenders approach. First, install self-adhered ice-and-water shield at the eave and lap underlayment correctly up-slope. Second, overlap aluminum drip edge and apron flashing in the direction of water flow and bed each lap in approved roofing sealant, fastening into the deck (not the fascia). This combination stays watertight through seasonal expansion and contraction.
How do you handle corners at the eave and roof-to-wall intersections?
Miter and overlap drip-edge corners with laps oriented down-slope. At roof-to-wall intersections, install step flashing shingle-by-shingle and finish with a properly sized kick-out flashing that discharges water away from the structure. Embed corner laps in sealant and ensure apron flashing still tucks behind shingles for complete protection.
What are the most common mistakes to avoid during roof edge installation?
The most frequent and costly roof-edge mistakes include:
- Missing ice-and-water shield at the eave, which invites wind-driven rain and ice-dam leaks.
- Omitting drip edge or installing it out of sequence with underlayment, allowing water behind the fascia.
- Misaligned starter strip and first-course shingles that don’t properly shed water.
- Failing to tuck apron flashing under the shingles, leading to fascia rot and siding damage.
- Ignoring damaged fascia or soffit; unchecked moisture can signal a need for roof repair in Downers Grove, IL and broader attention to your residential roofing system.
Protect Your Home with Professional Roof Edge Installation
A roof-first approach to any roofing project is a critical investment in your home’s structural health. When the eaves are waterproofed with ice-and-water shield, drip edge is overlapped and sealed, and apron flashing is correctly integrated, the entire assembly—from shingles to fascia to foundation—stays protected.
Homeowners in Downers Grove and Naperville, IL trust Adept Construction, Inc. for roof-edge inspections, code-compliant underlayment and metal installation, and comprehensive roofing solutions. Our experienced team uses high-quality materials and proven techniques to build roof systems that withstand Illinois weather, from heavy rains to winter ice, and every project is backed by workmanship you can count on.
Get peace of mind and a watertight roof edge. Contact Adept Construction, Inc. today for a free estimate on our expert residential roofing services.