Why Asphalt Roof Leak Repair Should Be Your Top Priority
Asphalt roof leak repair is critical the moment you spot water stains on your ceiling or smell mustiness in your attic. A small leak can quickly cause significant damage to your home’s structure, insulation, and drywall, leading to mold and rot that cost thousands to fix. As a leading roofing company in Illinois, we know that proactive repairs protect your investment. This guide will help you tackle minor leaks yourself.
Quick Action Guide:
- Find the leak: Check the attic for water stains and trace them uphill to the source.
- Inspect outside: Look for damaged, missing, or curled shingles, especially around vents and chimneys.
- Gather supplies: You’ll need roofing cement, replacement shingles, a pry bar, hammer, and caulking gun.
- Make the repair: Replace damaged shingles or seal penetrations and nail pops.
- Know your limits: Call a professional for widespread damage, an old roof, or structural issues.
The good news is that a DIY fix can save you money. Professional repairs average between $379 and $1,755, while fixing a single damaged shingle may cost less than $30 in materials. With the right guidance, it’s a manageable project for a confident homeowner.
I’m Gerald Michaels, founder of Adept Construction, Inc. Since 1997, my team and I have helped countless homeowners across Chicago’s West Suburbs decide when a DIY fix makes sense and when professional intervention is the smarter investment.

First, Find the Leak: An Inside-Out Investigation
The tricky thing about roof leaks is that water rarely drips directly below the entry point. It can travel along rafters and decking before appearing on your ceiling. A thorough investigation is the most critical step in effective asphalt roof leak repair to ensure you fix the actual source of the problem, not just the symptom.
Telltale Signs Inside Your Home
Your home will often signal a problem before you need to climb a ladder. Be on the lookout for these red flags:
- Water stains on ceilings: Telltale yellowish rings or dark patches that grow after rain.
- Discolored streaks on walls: Indicates water traveling from a higher leak point.
- Peeling or bubbling paint: Moisture causes paint to lose its grip on drywall.
- A persistent musty odor: Signals hidden moisture in your walls or attic.
- Visible mold or mildew: Black, green, or white fuzzy patches indicate an active moisture problem and health hazard.
Playing Detective in the Attic
Your attic is where the real investigation begins. Grab a bright flashlight or headlamp and proceed with caution.

Attic Safety: Always step only on the wooden joists or rafters, never on the ceiling material between them. Watch for exposed nails and electrical wires. Once safely positioned, look for damp or compressed insulation and dark water stains on the wood of the roof deck. Since water flows downhill, you must follow moisture trails “uphill” to the source. The highest point of moisture is usually closest to the leak’s entry point.
Inspecting Your Roof’s Exterior
After narrowing down the area from inside, head outside for a visual inspection. You can start with binoculars, but a sturdy ladder is necessary for a close look. Look for obvious signs of damage:
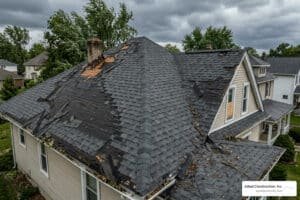
- Curling or cracked shingles: Signs of aging that create pathways for water.
- Missing shingles: Exposed areas left vulnerable after high winds.
- Widespread granule loss: Bald spots on shingles or granules in gutters indicate a deteriorating roof.
- Popped or rusted roofing nails: These create small but direct entry points for water.
- Damaged flashing: Check for cracks, gaps, or rust on the metal seals around chimneys, vents, and skylights.
Common Leak Culprits on an Asphalt Roof
Years of experience in residential roofing have shown us that certain areas are more prone to leaks. Focus your search on these common culprits:
- Roof penetrations: Vents, chimneys, and skylights are the most common leak sources due to failed flashing.
- Ice dams: In cold climates like Illinois, melted snow can refreeze at the eaves, causing water to back up under shingles.
- Old, worn-out shingles: Most asphalt shingles last 20-25 years. An aging roof with multiple leaks may need replacement.
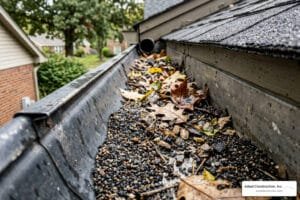
- Clogged gutters: Debris can cause water to overflow and seep under the roof edge.
Gearing Up: Tools and Materials for Your Repair
Before starting your asphalt roof leak repair, gathering all your tools and materials will make the job safer and more efficient. There’s nothing worse than being on a roof and realizing a crucial tool is in the garage.
Safety is Non-Negotiable
Roofing work is inherently dangerous. Prioritize your safety with the right gear:
- Sturdy extension ladder: Position it on firm ground and extend it at least 3 feet above the roofline.
- Safety harness: Essential for roofs with a steep pitch (a 6/12 slope or greater).
- Non-slip, soft-soled boots: Provide traction without damaging shingles.
- Heavy-duty gloves and safety glasses: Protect your hands and eyes from sharp materials and debris.
Your DIY Repair Toolkit

For most minor repairs, you will need a few key tools and materials:
- Pry bar: For gently lifting shingles.
- Hammer and galvanized roofing nails: For securing new shingles.
- Utility knife: For cutting shingles to size.
- Caulking gun and trowel: For applying sealants and cements.
- Wire brush: For cleaning the repair area.
- Replacement shingles: Matched to your current roof if possible.
- Roofing cement or sealant.
Choosing the Right Repair Product
The key to a lasting repair is selecting the correct product for the job. Using the wrong one is a temporary fix at best.
- Roof Cement: This thick, asphalt-based paste is applied with a trowel and is ideal for filling larger gaps, patching holes, and bedding shingles. It provides a durable, waterproof seal.
- Roof Sealant: Thinner than cement and applied with a caulking gun, sealant is perfect for smaller cracks and sealing seams around flashing and vents where flexibility is needed.
- Wet Patch Products: For emergency repairs, products like Henry 208 Wet Patch are designed to adhere to wet surfaces and stop leaks instantly, even in poor weather. They are a lifesaver when you can’t wait for dry conditions.
- Repair Fabric: For holes larger than 1/4 inch, embedding repair fabric into roof cement adds structural reinforcement and is often required for product warranties.
Always check the product’s instructions for application temperature ranges and warranty details to ensure your repair lasts.
The Fix: A Step-by-Step Guide to Minor Asphalt Roof Leak Repair
With the leak located and your gear ready, it’s time to make the repair. Follow these steps carefully for a watertight seal.
How to Replace a Damaged or Missing Shingle
Replacing a single shingle is a common and manageable asphalt roof leak repair. The key is to work slowly and carefully to avoid damaging the surrounding shingles.

- Expose the nails: Gently lift the shingle above the damaged one with a pry bar to expose the nail heads.
- Remove the old shingle: Use the pry bar to pull out the nails and slide the damaged shingle out.
- Position the new shingle: Slide the new shingle into place, ensuring its bottom edge aligns perfectly with the neighboring shingles.
- Secure the new shingle: Drive four galvanized roofing nails into the new shingle, in the same locations as the original. The nail heads should be flush with the shingle surface and will be covered by the shingle above.
- Seal the nail heads: Apply a small dab of roof sealant over each new nail head for an extra layer of waterproofing.
Sealing Leaks Around Vents, Pipes, and Chimneys
Penetrations are notorious leak spots. Proper sealing is crucial for a long-term fix.
- Clean the area: Use a wire brush to remove all dirt, debris, and old, cracked sealant. A clean surface is essential for proper adhesion.
- Inspect the flashing: Look for cracks, rust, or tears in the metal flashing or rubber boot around the penetration. If the boot is brittle or crumbling, it needs to be replaced.
- Apply new sealant: Apply a generous, continuous bead of high-quality, flexible roofing sealant to all seams where the flashing meets the roof and the pipe or vent.
- Smooth the bead: Use a putty knife or a gloved finger to smooth the sealant, ensuring it completely fills all gaps and creates a seamless transition.
How to Fix a Nail Pop Leak
A nail that has worked its way up through a shingle creates a direct path for water. This is one of the easiest roof repairs.
- Lift the shingle: Gently use a pry bar to lift the shingle covering the popped nail.
- Remove the old nail: Pry out the popped nail completely. Do not hammer it back in.
- Seal the hole: Apply a dab of roof sealant into the empty nail hole.
- Drive a new nail: Hammer a new roofing nail about one inch away from the original hole, ensuring it grips fresh wood.
- Seal the new nail: Cover the head of the new nail with sealant to complete the waterproof barrier.
DIY vs. Calling a Pro: Knowing Your Limits
A successful DIY repair is rewarding, but knowing when to call for professional help is the smartest decision a homeowner can make. Taking on a job that’s too big can be dangerous and lead to more expensive problems.
When a DIY asphalt roof leak repair is a Good Idea
A DIY approach to asphalt roof leak repair makes sense in specific situations:
- The damage is minor and isolated, such as one or two missing shingles.
- The leak is from a simple nail pop, which is an easy and quick fix.
- Your roof has a low, walkable pitch, making it safer to steer.
- You are comfortable working at heights and confident on a ladder.
- The repair cost is minimal, requiring only a few dollars in materials.
Red Flags: When to Call a Professional Roofer Immediately
Ignoring these red flags can turn a small leak into a major catastrophe. Call a professional immediately if you see any of the following:
- Widespread damage or multiple leaks: This indicates a systemic problem with your roof, not an isolated issue.
- Your roof is over 20 years old: Leaks on an old roof often signal that it has reached the end of its lifespan and repairs are no longer cost-effective.
- Signs of sagging or soft spots: This is a major red flag for structural damage to the roof deck, which requires immediate expert attention.
- Complex flashing or roof valley repairs: These intricate areas require specialized knowledge to repair correctly. Improper work can make leaks worse.
- Significant storm damage: High winds and hail can cause hidden damage. If you live in an area like Downers Grove, IL or Naperville, IL, a professional inspection after a storm is wise. An expert roof repair in Downers Grove, IL or a professional roof repair in Naperville, IL can identify issues before they escalate.
Frequently Asked Questions about Asphalt Roof Leak Repair
How much does it cost to fix a roof leak?
The cost to fix a roof leak professionally ranges from $379 to $1,755, with an average around $1,100. However, a minor DIY asphalt roof leak repair, such as fixing a nail pop or replacing a single shingle, can cost less than $30 in materials. Acting quickly prevents more expensive interior water damage repairs.
How long does a roof patch last?
A properly applied patch using high-quality materials can last from 2 to 10 years. Many modern sealants come with 7-10 year warranties. However, a patch should be considered a semi-permanent fix. Its primary purpose is to stop a leak and extend the roof’s life until a full replacement is feasible, especially if the roof is already over 20 years old.
Can I do a roof repair in the rain?
No, working on a wet roof is extremely dangerous and should be avoided. The risk of slipping and falling is too high. For emergencies, specialized “wet patch” roofing cements like Henry 208 Wet Patch are designed to adhere to wet surfaces and can stop a leak instantly. These are intended as temporary solutions until a permanent repair can be made in safe, dry conditions. If you’re facing an emergency leak, our team can help you determine if an emergency patch or a more comprehensive residential roofing solution is needed.
Conclusion: Protect Your Investment with Proactive Care
Learning to handle a minor asphalt roof leak repair is an empowering skill that protects your home and saves you money. By identifying leaks early and making timely repairs, you can prevent small issues from becoming major headaches like structural damage and mold growth.
However, the most important part of any DIY project is knowing your limits. If the damage is widespread, your roof is nearing the end of its 20-25 year lifespan, or you simply don’t feel safe working at heights, calling a professional is the smart choice. A pro can identify hidden damage you might miss, ensuring a complete and lasting repair.
Your Next Steps for a Leak-Free Roof
If you’ve assessed the damage and feel the job is beyond a simple DIY fix, or if you want a professional inspection for peace of mind, we’re here to help. Adept Construction, Inc. has served homeowners across the Chicago suburbs for nearly three decades, building a reputation on honesty and quality workmanship.
We offer free, no-obligation estimates. Whether you need a simple repair, a complete roof replacement in Downers Grove, IL, or an expert roof repair in Naperville, IL, our team is ready to provide the quality work you deserve.
Contact Adept Construction, Inc. today for your free estimate and ensure your home stays safe and dry for years to come.