A DIY Guide to Installing Cedar Shake & Shingle Exteriors
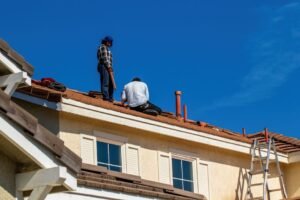
Installing cedar shingle siding or roofing is a labor-intensive project, but one that delivers unparalleled natural beauty and durability. This guide focuses on cedar shake and shingle roofing practices; many principles also apply to walls. If at any point you prefer a pro to handle the work, talk with a trusted roofing contractor in Downers Grove to ensure code-compliant results and long-term performance: trusted roofing contractor in Downers Grove.
Key Installation Steps:
- Choose Materials: Select the right grade of Western Red or Eastern White Cedar.
- Prepare Surfaces: Use proper roofing underlayment and plan your layout.
- Install Courses: Start with a double starter course and maintain consistent exposure and joint offsets.
- Fasten Correctly: Use stainless steel nails placed properly to avoid damage and ensure longevity.
- Finish Details: Carefully handle eaves, valleys, hips, ridges, and flashing transitions.
The process requires patience and precision. As one seasoned contractor notes: “Cedar shingles are the most labor-intensive siding choice.” Expect several full-day weeks of work. The classic overlapping pattern, where only about one-third of each shingle is exposed, is what makes cedar so weather-resistant.
I’m Gerald Michaels, founder of Adept Construction, Inc. With nearly three decades of roofing and exterior experience in the Chicago area, I’ve learned that proper preparation makes the difference between a good job and an exceptional one. If you’re considering a cedar project for your roof or siding, we have the expertise to guide you.

Before You Begin: Choosing Materials and Tools

Success starts with the right materials and tools. Your choices here will set the stage for the entire project.
Types of Cedar Shingles and Shakes
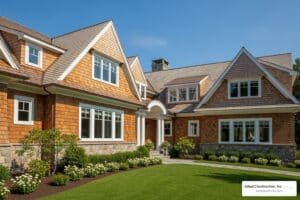
Western Red Cedar is the gold standard, prized for its natural resistance to decay and insects. Eastern White Cedar is another excellent choice, known for weathering to a beautiful silver-gray, especially popular in coastal areas.
Shingles are sawn smooth, while shakes are split from logs for a rustic, textured look. For quality, look for No. 1 Blue Label shingles, which are 100% clear heartwood. Rebutted & Rejointed (R&R) shingles are remanufactured for perfectly straight and parallel sides, which simplifies installation. For more detailed specifications on grades, see the Cedar Shake & Shingle Bureau.
Essential Tools and Materials
The right tools make the job manageable.
- Fastening: A traditional hammer is needed for adjustments, but a coil siding/roofing nailer will dramatically speed up the work.
- Accuracy: A long level, chalk line, and a story pole (a custom measuring stick for your course exposures) are crucial for straight lines.
- Cutting: A sharp utility knife and a block plane are essential for trimming and fitting shingles and shakes.
- Protection: Use roofing underlayment rated for wood roofs (e.g., No. 30 felt or appropriate synthetic underlayment). For shakes, plan for interlayment felt between courses.
- Fasteners: Stainless steel ring-shank nails are mandatory to prevent rust stains and provide superior holding power.
- Safety: Always use eye and ear protection, plus a dust mask.
Storing and Acclimating Your Shingles
Cedar expands and contracts with moisture. Store bundles on pallets off the ground in a dry, ventilated area. Allow the shingles to acclimate to your local humidity for several days before installation to help prevent warping or buckling. Kiln-dried shingles will swell in humid weather and need wider installation gaps (approx. 3/16 inch), while green shingles will shrink as they dry and should be installed with minimal gaps.
Wall and Roof Deck Preparation

A flawless finish starts with meticulous preparation of the roof deck. This stage ensures your cedar roof will look uniform and effectively protect your home from the elements.
Preparing the Roof Deck, Underlayment, and Flashing
Before any shakes or shingles go on, confirm the roof deck is sound, flat, and free of protruding nails.
Next, install your roofing underlayment. For cedar shingles, use an appropriate felt or synthetic underlayment over the entire deck per code. For cedar shakes, install a starter underlayment at the eaves and use 18-inch-wide No. 30 felt interlayment between shake courses (placed so its lower edge sits just above the exposure line). Proper metal flashing at eaves/drip edges, valleys, sidewalls, skylights, and chimneys is absolutely critical. Layer all materials shingle-style, with upper elements overlapping lower ones to direct water off the roof.
Calculating Exposure and Laying Out Courses
Consistency is key to a professional look. A precise layout ensures your courses are straight and uniform.
- Story Pole/Marks: Mark exposures on a story pole or directly on the deck and snap chalk lines for each course.
- Reveal: Adjust your reveal slightly if needed to land cleanly at hips, ridges, or around penetrations. Always adhere to the manufacturer’s maximum exposure rules to ensure weather tightness.
- Material Calculation: Measure the total square footage of your project area. Cedar is sold by the “square” (100 sq. ft. of coverage). Order 10-20% extra to account for waste, cuts, and starter courses.
- Reference Lines: Use a laser level and chalk line to snap perfectly straight reference lines. Getting the first line right is essential for the entire installation.
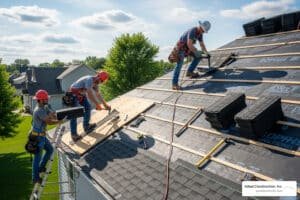
The Installation Process

With your prep work complete, it’s time for the main event. This is where methodical precision pays off in a beautiful, long-lasting cedar roof.
Installing the Starter and First Courses
The starter course is the foundation for everything that follows. On roofs, it is a double layer.
- Install the first layer (the undercourse or starter) at the eave.
- Install the first exposed course directly over the starter.
- Crucially, offset the joints of the top layer by at least 1.5 inches from the joints of the undercourse below, and never align joints in any three consecutive courses.
At the eave, ensure proper overhang and drip-edge integration to shed water cleanly.
Nailing Techniques for a Secure Installation
Proper fastening is critical for a durable, beautiful finish.
- Nail Type: Use stainless steel ring-shank nails to prevent rust stains and ensure maximum holding power.
- Nail Placement: Drive two fasteners per shingle/shake, positioned about 3/4 inch from each side edge and approximately 1 inch above the exposure line of the next course. This hides the nails while providing optimal strength.
- Nail Depth: Fasteners should sit flush with the surface. Do not over-drive them, as this crushes the wood fibers and reduces holding power. Adjust your pneumatic nailer’s pressure accordingly.
- Penetration: Nails should penetrate at least 3/4 inch into the deck or through the deck by 1/4 inch.
Cutting, Fitting, and Finishing Roof Details
Craftsmanship shines in the details around transitions and penetrations.
- Cutting: Most cuts can be made with a sharp utility knife and a square. Score deeply several times, then snap it cleanly. A fine-tooth saw also works well for thicker shakes.
- Penetrations: Carefully measure and cut to fit around vents, skylights, and chimneys. Integrate step flashing and counterflashing shingle-style.
- Valleys: Choose an open metal valley or a closed valley detail per manufacturer guidelines; install underlayment and flashing carefully.
- Hips and Ridges: Finish with pre-formed or site-cut hip and ridge units, installed with proper exposure and fasteners.
Finishing, Maintenance, and Common Pitfalls

The job isn’t over once the last shingle is up. Proper finishing and long-term care will protect your investment and keep your cedar roof looking its best for decades.
Finishing Options for Cedar
- Natural Weathering: Let your cedar age naturally to a beautiful silver-gray. This is a popular, low-maintenance option for roofs.
- Penetrating Oil-Based Stains/Preservatives: These breathable finishes protect the wood while showcasing the natural grain. Avoid film-forming coatings that can peel or trap moisture. Paint is not recommended on cedar roofs.
If you choose to finish, apply treatments per manufacturer guidance and avoid sealing the roof in a way that inhibits drying.
Common Mistakes to Avoid
- Incorrect Spacing: Gaps that are too wide let in wind-driven rain; gaps that are too tight cause buckling. Adjust spacing based on whether your shingles are kiln-dried or green.
- Improper Nailing: Over-driven nails damage the wood, while under-driven nails are ineffective. Incorrect placement can cause splitting and leaks.
- Misaligned Courses: Use chalk lines and a level to ensure every course is perfectly straight.
- Poor Flashing: A primary cause of leaks. Ensure eave, valley, sidewall, and chimney flashings are installed correctly.
- Skipping Acclimation: Shingles should adjust to local humidity before installation to reduce future movement.
- Joint Alignment: Never allow joints to align in any three consecutive courses; maintain a 1.5-inch minimum offset.
Long-Term Maintenance and Lifespan
With proper installation and care, cedar roofs can last 30 to 50 years or more.
- Cleaning: Gently rinse with a garden hose as needed to remove dirt and debris. Avoid high-pressure washing.
- Moss/Algae: In damp or shaded areas, treat biological growth with a roof-safe cleaner per manufacturer directions, followed by a thorough rinse.
- Inspections: Seasonally inspect for and replace any cracked, loose, or damaged shakes/shingles to prevent water intrusion.
- Re-treatment: Preservative treatments or stains typically need re-application every few years, depending on exposure and product used.
Frequently Asked Questions about Cedar Siding Installation
Should I DIY or hire a professional for cedar roofing installation?
This is a demanding project that requires significant time, patience, and precision. A DIY approach can save money if you have strong carpentry skills. However, given the complexity of ensuring a weatherproof roof system, hiring a professional is often the wisest choice. A pro guarantees a high-quality, efficient installation that meets all local codes, which is why many homeowners in areas like Naperville, IL trust experts for the job.
Should I install cedar shingles or shakes with the rough or smooth side up?
This is largely an aesthetic choice. Rough side up provides a rustic, textured look that holds stain well and is common with shakes; smooth side up creates a more refined, uniform appearance. Whichever you choose, be consistent across the entire project.
How does humidity affect shingle spacing?
Wood expands and contracts with moisture. Kiln-dried shingles are dry and will swell in humidity, so they need a wider gap (about 1/8″ to 1/4″). Green (wet) shingles will shrink as they dry, so they should be installed with a minimal gap (no more than about 1/8″) to prevent large spaces from forming later.
Conclusion
Installing cedar shake or shingle roofing is a challenging but rewarding project that adds best natural beauty and value to your home. From selecting the right materials to mastering the details of layout, fastening, and flashing, the process demands a significant investment of time and a meticulous eye for detail.
While a DIY installation is achievable for a skilled individual, the complexity and high stakes of protecting your home mean there is little room for error. Professional installation provides peace of mind and a guaranteed, long-lasting result. The experienced team at Adept Construction, Inc. specializes in cedar shake roofing and has helped homeowners in the Chicago area achieve stunning, durable roofs for nearly three decades.
If you want to ensure your project meets the highest standards of craftsmanship and weather protection, we’re here to help. For a durable and expertly installed cedar shake roof that improves your home’s curb appeal, contact us today for a free estimate on your cedar shake project. We proudly serve homeowners throughout Downers Grove and the surrounding communities, including Downers Grove, IL. For more on our cedar-shake offering, visit our page on cedar shake roofing.