Why Cedar Roofing Installation Requires Expert Precision
Cedar roofing installation is a specialized craft that improves your home with natural beauty and exceptional durability. However, it demands precise technique and quality materials to achieve its full potential. While this guide provides a comprehensive overview, the project’s complexity often requires the expertise of a professional for your roofing repairs, replacements, and installations to ensure it’s done right. Here’s what you need to know:
Key Steps in Cedar Roofing Installation:
- Prepare the deck – Remove old materials, inspect sheathing, and install an ice/water shield and underlayment.
- Ensure ventilation – Install a ventilation matrix or spaced sheathing to prevent moisture damage.
- Lay starter course – Use a double layer with a 1-1/2″ overhang for proper water shedding.
- Install subsequent courses – Stagger joints, maintain proper spacing (1/4″-3/8″ gaps), and use corrosion-resistant nails.
- Flash critical areas – Valleys, hips, ridges, and penetrations require specialized metal flashing.
Essential Materials:
- Premium or No. 1 Grade cedar shakes/shingles (CSSB certified)
- Stainless steel or hot-dipped galvanized nails
- No. 30 felt underlayment and ice/water shield
- Ventilation matrix or breathable underlayment
- Metal flashing (copper or galvanized steel)
Cedar shakes can last 30 years or more when properly installed and maintained, compared to 20-30 years for standard asphalt shingles. The material’s natural oils resist decay, while its insulating properties can double the R-value of conventional roofing. However, installation mistakes are costly. Improper spacing leads to water infiltration, inadequate ventilation causes rot, and using the wrong fasteners creates rust streaks.
At Adept Construction, Inc., we’ve overseen countless cedar roofing installations across Chicago’s western suburbs since 1997. This guide draws from our decades of hands-on experience to help you understand what makes a cedar roof installation successful.
; Step 2 - Ventilation Setup (install ventilation matrix or spaced sheathing, ensure 1/150 ceiling area ratio, add ridge and soffit vents); Step 3 - Starter Course (double layer of shingles, 1-1/2 inch eave overhang, proper alignment); Step 4 - Main Courses (stagger joints minimum 1-1/2 inches, maintain 1/4-3/8 inch gaps for shingles or 3/8-5/8 inch for shakes, two corrosion-resistant nails per piece placed 3/4 inch from edges); Step 5 - Flashing Installation (W-shaped metal valley flashing, pre-formed ridge caps with double course, step flashing for chimneys, pipe boots for vents). Timeline shows 6 squares per day with experienced crew. Material requirements listed as Premium Grade CSSB certified cedar, stainless steel or galvanized nails, breathable underlayment, copper or galvanized metal flashing. - cedar roofing installation infographic")
Pre-Installation Essentials: Choosing Your Materials and Tools
The foundation of a successful cedar roofing installation begins long before the work starts. Choosing the right materials and tools determines whether your roof will last for decades or become a source of headaches.

Cedar Shakes vs. Shingles
Though often used interchangeably, shakes and shingles have key differences:
- Cedar shingles are machine-sawn on both sides for a smooth, uniform appearance. They are thinner and create a refined, consistent look.
- Cedar shakes are traditionally hand-split or machine-split, giving them a rustic, textured look. They are thicker, which improves durability and creates deeper shadow lines.
Within shakes, hand-split shakes are rough on both sides, while tapersawn shakes are sawn but maintain a robust thickness for a smoother yet durable finish.
Cedar Grading Standards and Certifications
Quality is paramount for longevity. We recommend products certified by the Cedar Shake and Shingle Bureau (CSSB), which sets strict grading standards.
- Premium Grade (Blue Label): This is the highest quality, consisting of 100% clear, 100% edge grain, and 100% heartwood. It is the most stable and curl-resistant cedar available.
- Number 1 Grade (Red Label): This grade allows for a minimum of 80% edge grain. The remaining flat grain pieces are more prone to curling over time. In our experience installing cedar shake roofing, premium grade is worth the investment for its longevity.
Pros and Cons of Cedar Roofing
Pros:
- Durability: Cedar’s natural oils resist decay and insects, offering a 30 to 50-plus year lifespan with proper care.
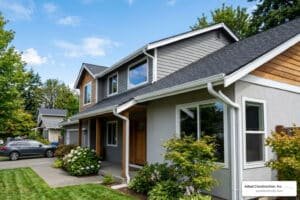
- Aesthetics: It provides a timeless beauty, whether in its natural red-brown color or a weathered silver-gray patina.
- Insulation: Cedar can double the R-value of conventional roofing, potentially lowering energy bills.
- Eco-Friendly: Sustainably sourced cedar is a renewable and biodegradable resource.
Cons:
- Cost: Materials and installation are more expensive than asphalt shingles.
- Maintenance: Regular cleaning and periodic treatments are necessary to maximize lifespan.
- Fire Resistance: Natural cedar is more flammable than other materials, though treatment options are available.
For a broader perspective, our guide on comparing roofing materials can help you weigh your options.
| Feature | Cedar Shakes | Cedar Shingles | Synthetic Cedar Shakes |
|---|---|---|---|
| Appearance | Rustic, textured, deep shadow lines | Smooth, uniform, consistent shadow lines | Mimics natural cedar, consistent look |
| Thickness | Thicker (1/2″ butt minimum) | Thinner (3/8″ butt minimum) | Consistent, designed for durability |
| Installation | More involved, requires specific spacing & felt interlay | Detailed, uniform spacing | Easier, no acclimation, specialized tools |
| Maintenance | Regular cleaning, periodic treatments | Regular cleaning, periodic treatments | Minimal, virtually maintenance-free |
| Durability | Excellent (30-50+ years) | Excellent (30-50+ years) | Exceptional (50+ years, impact/fire resistant) |
| Cost | High | High | High (initial), lower long-term |
| Insulation | High natural R-value | High natural R-value | Varies by product, some are “cool roof” rated |
| Acclimation | Required before installation | Required before installation | Not required |
| Ventilation | Critical for longevity | Critical for longevity | Less critical, often integrated |
Essential Tools and Materials
A proper cedar roofing installation demands specific tools and premium materials. Key tools include a roofing hammer, pry bar, chalk line, utility knife, and tape measure. For materials, always start with premium grade, CSSB certified cedar. Fasteners are critical—use only stainless steel (Type 304 or 316) or hot-dipped galvanized ring shank nails. For underlayment, an ice and water shield is crucial at eaves and valleys, with No. 30 roofing felt covering the entire deck. A ventilation mat ensures airflow, and sheet metal flashing (copper or galvanized steel) protects vulnerable areas.
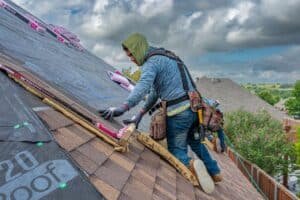
Safety First: Key Precautions for Roof Work
Safety cannot be compromised. Always use a properly fitted safety harness and ropes secured to a sturdy anchor point. Ensure ladders are stable and extend above the eave. Roof jacks provide a stable platform on sloped roofs. Never work on a wet, icy, or windy roof. Wear eye protection and take precautions against wood dust, which can be an irritant. For detailed wood dust safety information, consult relevant guidelines. If this preparation seems overwhelming, it’s wise to call a professional. Many homeowners in Downers Grove and Naperville contact us for a free estimate after realizing the complexity involved.
The Step-by-Step Cedar Roofing Installation Process
With materials selected and safety measures in place, the meticulous work of cedar roofing installation can begin. Each step builds on the last to create a durable, protective roof system.

Step 1: Preparing the Roof Deck
The roof deck is the foundation of your roofing system. We begin by completely removing all existing roofing materials. Roofing over old layers is against most building codes and hides potential problems. Once the deck is clear, we conduct a thorough inspection for rot or water damage, replacing any compromised sheathing to ensure a strong, uniform substrate. New construction requires a minimum deck thickness of 7/16″ OSB or 1/2″ plywood. Next comes the underlayment, starting with a self-adhering ice and water shield along the eaves and in all valleys. Finally, we install No. 30 roofing felt over the entire deck. For shakes, 18-inch-wide strips of felt are also used as interlayment between courses to shed water and help the wood dry.
Step 2: Ensuring Proper Ventilation
Cedar is a natural material that must breathe. Proper ventilation is the difference between a cedar roof that lasts 30 years and one that fails in 15. Without adequate airflow, trapped moisture leads to cupping, rot, and premature deterioration. The goal is to allow shakes to dry evenly from both sides. Modern methods achieve this with a ventilation matrix (like CedAir-Mat) over a solid deck or with breathable underlayment systems. We also incorporate a combination of ridge and soffit vents to create continuous airflow through the attic space. Building codes typically require ventilation openings of at least 1/150 of the insulated ceiling area to ensure proper air exchange.
Step 3: Laying the Courses for your cedar roofing installation
This is where precision ensures a watertight and beautiful roof. We begin with the starter course, a double layer of shingles overhanging the fascia by 1-1/2 inches. This provides extra strength and ensures proper water shedding. We snap chalk lines to guide each course for consistent exposure and straight lines.
Spacing is critical for allowing the wood to expand and contract. Shingles require a 1/4-inch to 3/8-inch gap, while shakes need a 3/8-inch to 5/8-inch gap. Each piece gets two corrosion-resistant nails (stainless steel or hot-dipped galvanized) placed approximately 3/4 inch from the edges and 1-1/2 inches above the exposure line. This placement prevents leaks and avoids splitting the wood. Nails must be driven flush, never overdriven or underdriven.
As we lay subsequent courses, we stagger joints by at least 1-1/2 inches from the course below to prevent water intrusion. For shake installations, we add an interlaid felt strip over the top of each course, creating an additional water-shedding layer.
Step 4: Flashing Valleys, Hips, Ridges, and Penetrations
Proper flashing is essential to prevent leaks at critical junctions. We’ve seen many installations fail due to poor flashing.
- Valleys: We use open valleys lined with W-shaped metal flashing (16 oz. copper or 30 ga. galvanized steel) over a self-adhering underlayment for maximum protection.
- Hips and Ridges: These are capped with pre-formed or site-fabricated cedar caps. We prefer a double course of shakes with alternating joints for a robust and aesthetic finish.
- Penetrations: For chimneys and dormers, we integrate individual pieces of metal step flashing with each course. For vent pipes, we use specialized pipe boots sealed and integrated with the surrounding shakes.
Proper mechanical integration, not just sealant, is what makes flashing last for decades. If you’re considering a cedar roofing installation in the Downers Grove or Naperville area, these details matter. At Adept Construction, Inc., we’ve perfected these techniques over decades. Contact us for a free estimate on your cedar shake roofing project.
Common Mistakes, Maintenance, and Alternatives
Even with the best intentions, mistakes during a cedar roofing installation can compromise its longevity. Understanding these pitfalls and committing to proper maintenance is key.

Top Mistakes to Avoid During a Cedar Roofing Installation
Attention to detail during installation is what separates a roof that lasts for decades from one that fails in a few years.
- Improper Fastening: Overdriving nails splits the wood, while using the wrong type (e.g., not corrosion-resistant) leads to rust streaks and fastener failure.
- Incorrect Spacing: Gaps that are too small trap moisture, leading to rot and cupping. Gaps that are too large expose the underlayment. The correct spacing is 1/4″ to 3/8″ for shingles and 3/8″ to 5/8″ for shakes.
- Inadequate Ventilation: Trapping moisture beneath the shakes is a primary cause of premature failure. A cedar roof must breathe from both sides.
- Skipping the Starter Course: A single-layer starter course compromises the roof’s integrity at its most vulnerable edge.
- Ignoring Wood Acclimation: Cedar must acclimate to local humidity before installation to prevent future buckling or cracking.
For more details on these pitfalls, the Cedar Shake and Shingle Bureau offers excellent resources at cedarroofcoatings.com.
Post-Installation Care for a Long-Lasting Cedar Roof
A cedar roof requires care to maintain its beauty and protective qualities.
- Regular Inspections: Check your roof twice a year (spring and fall) and after severe weather for loose, damaged, or missing shakes.
- Cleaning: Keep the roof free of debris like leaves and branches to prevent moisture traps that cause rot. Gently remove moss or algae with a soft brush or low-pressure water—never a pressure washer.
- Treatments: Wood preservatives can help maintain the cedar’s color and inhibit moss growth, extending its life.
- Professional Maintenance: If you spot significant damage or persistent leaks, it’s time to call a professional. We offer comprehensive roof repair in Downers Grove, IL to address such issues.
With proper care, a cedar roof can last 30 to 50 years. To learn how this compares to other materials, read our article on What Type of Roof Has the Longest Lifespan?.
Natural Cedar vs. Synthetic Cedar Shakes
Synthetic alternatives offer the look of cedar with different performance characteristics.
- Installation: Synthetics are often easier to install, requiring no acclimation period and featuring consistent dimensions.
- Maintenance: Synthetic cedar is virtually maintenance-free, a compelling benefit for many homeowners.
- Durability: Many synthetic products are engineered for Class 4 hail impact resistance and Class A fire resistance, offering superior protection in some areas.
- Aesthetics: High-quality synthetics closely mimic the look of natural cedar but with a more uniform appearance. The choice comes down to a preference for natural character versus consistent uniformity.
If you’re interested in the benefits of cedar without the maintenance, explore our composite roofing options.
Frequently Asked Questions about Cedar Roof Installation
After installing cedar roofs in the Chicago western suburbs for over two decades, we’ve heard some common questions. Here are the answers.
How long does a cedar roof last?
A properly installed and maintained cedar roof can last 30 years or more, with some lasting over 50 years. Longevity depends on four factors: material quality, installation craftsmanship, local climate, and consistent maintenance.
Can you install cedar shakes over existing shingles?
No. Installing cedar shakes over existing shingles is against most building codes and is not recommended. For a proper cedar roofing installation, a complete tear-off is required. This allows for inspection and repair of the roof deck, ensuring a solid foundation for the new roof, which is critical for its performance and lifespan. If you’re considering a roof replacement in Naperville, IL, we always start with a complete tear-off.
What is the best type of nail for cedar shingles?
Corrosion-resistant nails are absolutely essential. We exclusively use stainless steel (Type 304 or 316) or hot-dipped galvanized ring shank nails. These prevent rust streaks and ensure the fasteners last as long as the cedar. The nails must have a head diameter of at least 3/16″ and be long enough to penetrate the sheathing. This small detail makes a huge difference in your roof’s longevity. Contact us today for a free estimate, and we’ll show you the difference quality materials make.
Conclusion: Is a Cedar Roof Right for You?
A cedar roof is a premium investment that delivers unparalleled beauty and a long service life, but only when the cedar roofing installation is flawless. The process is a craft that requires precision, and the potential for costly errors from a DIY approach is high. Improper ventilation, incorrect fastening, or inadequate spacing can lead to premature failure and expensive repairs.
Professional expertise is crucial for a cedar roof to reach its full potential. At Adept Construction, Inc., we understand the nuances of cedar and have provided expert cedar shake roofing services in the Downers Grove and Naperville areas since 1997. We ensure your investment is protected and your home stands out with enduring charm.
Whether you’re considering a roof replacement in Downers Grove, IL or exploring options for a roof replacement in Naperville, IL, our team brings the precision and care that cedar roofing demands. We are committed to superior workmanship and customer satisfaction.
For a beautiful and long-lasting roof you can trust, partner with the experts. Contact us today for a free estimate on your roofing project. We’re here to help homeowners in Naperville, IL and Downers Grove, IL achieve their roofing goals with quality craftsmanship.