Why Cedar Shingle Repair Matters for Your Home
Cedar shingle repair is essential for maintaining your roof’s integrity and preventing costly water damage. Cedar roofs are known for their natural beauty and durability, but they require attention when damage occurs—whether from age, weather, or biological growth.
Quick Answer: Essential Cedar Shingle Repair Steps
- Inspect regularly for curling, splitting, or missing shingles
- Remove damaged shingles carefully using a slater’s ripper or pry bar
- Check the underlayment and repair any damaged sheathing
- Install new shingles with proper spacing (1/8 to 1/4 inch gaps)
- Seal and maintain to prevent future damage
Cedar roofs can last 30 to 50 years with proper care, making them a valuable investment for homeowners. However, ignoring small problems can lead to structural damage, interior leaks, and significantly shortened roof lifespan. Individual shingles can be replaced when damage is localized, making repairs manageable for many homeowners—though knowing when to call a professional is equally important.
As Gerald Michaels, I’ve spent nearly three decades in the roofing industry, and cedar shingle repair has been a consistent focus throughout my career with Adept Construction, Inc., a leading provider of professional roofing solutions. I’ve seen how timely repairs and proper maintenance can extend a cedar roof’s life well beyond expectations, saving homeowners thousands in premature replacement costs.

Simple cedar shingle repair word guide:
First, Inspect the Damage: What to Look For on Your Cedar Roof
Before we dive into the nitty-gritty of cedar shingle repair, the first and most critical step is a thorough inspection. Knowing what to look for can help us catch issues early, preventing minor nuisances from becoming major headaches. Ignoring these early warning signs can lead to structural damage, interior water damage, and a significant loss of energy efficiency in your home.

Here are the common signs of damage that indicate your cedar roof needs attention:
- Curling or Cupping Shingles: This is often one of the first visual cues. Shingles may curl upwards at the edges (cupping) or along their length (curling). This usually happens due to repeated cycles of wetting and drying, causing the wood fibers to expand and contract unevenly. This can leave your roof vulnerable to wind and water penetration.
- Splitting and Cracking: Cedar shingles can split or crack over time, especially with exposure to harsh UV rays and extreme temperature fluctuations. Splits create direct entry points for water, compromising the watertight seal of your roof.
- Moss, Algae, or Mold Growth: While cedar is naturally resistant to decay, prolonged moisture can encourage biological growth. Moss and algae retain moisture, keeping the wood wet for longer periods, which accelerates deterioration and can lead to rot. Dark streaking or green patches are tell-tale signs.
- Missing or Loose Shingles: High winds or improper installation can cause shingles to become loose or even blow off entirely. Missing shingles expose the underlying felt and sheathing to the elements, leading to rapid water damage.
- Discoloration and Water Stains: Uneven discoloration or dark streaking on your cedar shingles can indicate water damage or fungal growth, not just natural weathering. Inside your home, water stains on ceilings or walls, damp attic insulation, or increased attic humidity are clear indicators of a compromised cedar roof.
The weather here in Illinois plays a significant role in how our cedar roofs age. Heavy rainfall can lead to prolonged moisture exposure, encouraging moss and algae growth. Severe snowfall and subsequent melting cycles can lead to ice dam formation, where water backs up under shingles, causing leaks. Strong winds, common in our region, can lift and tear off shingles. UV radiation from the sun constantly breaks down the wood’s lignin, leading to surface weakening and a ‘washboard’ appearance over time.
Cedar Shingles vs. Cedar Shakes: What’s the Difference?
While often used interchangeably, cedar shingles and cedar shakes have distinct characteristics that affect their repair.
- Cedar Shingles are typically machine-sawn, giving them a more uniform thickness and a smoother, more refined appearance. They are cut precisely and lie flat.
- Cedar Shakes are usually hand-split or machine-cut to create a rougher, more textured, and rustic look. They are thicker and have a more irregular surface.
These differences impact repair. Shingles, being more uniform, might be easier to replace individually with a close match. Shakes, with their varying thickness and rustic nature, may require a bit more finesse to integrate new pieces seamlessly. The installation nuances also differ; shakes generally require a felt interlay between courses for added protection against wind-driven snow, while shingles may not.
Signs of Widespread Failure
Sometimes, the damage isn’t just an isolated incident; it’s a symptom of a larger, systemic problem indicating your roof is nearing the end of its life.
- Excessive Cedar Fragments in Gutters: While some granule loss is normal for asphalt shingles, excessive cedar fragments in your gutters indicate advanced deterioration of the shingles’ protective outer layer.
- Widespread Curling, Splitting, or Missing Shingles: If you see these issues across a significant portion of your roof, it’s a sign that the entire system is failing, not just a few individual pieces.
- Multiple Leaks: Consistent leaks in various parts of your home suggest that the roof’s protective barrier has been broadly compromised.
- Roof Age: A well-maintained cedar roof can last 30 to 50 years, but if your roof is approaching or has exceeded this age range, widespread damage is more likely.
- Installation Quality and Material Grade: Poor initial installation, such as improper fastening, insufficient ventilation, or the use of lower-grade cedar (which might have more flat-grain wood), can significantly shorten a roof’s lifespan and lead to premature widespread failure. Higher-grade cedar, often 100% edge grain, 100% clear, and 100% heartwood, offers superior durability and dimensional stability.
Repair or Replace? Making the Right Call
Once we’ve identified the signs of damage, the next crucial decision is whether to undertake cedar shingle repair or opt for a full replacement. This choice hinges on the extent of the damage, the age of your roof, and what makes the most financial sense in the long run.

Assessing the Scope of Damage:
A general rule of thumb in the roofing industry is the “30% rule.” If more than 30% of your roof is damaged, or if the damage is widespread and affects multiple areas, a full roof replacement might be more cost-effective than continuous repairs. Localized damage, such as a few cracked or missing shingles in one area, is usually a good candidate for repair.
Age as a Factor:
The typical lifespan of a cedar roof is between 30 to 50 years, with some lasting even longer with exceptional maintenance. If your cedar roof is relatively young (say, under 20-25 years) and the damage is isolated, repairs are almost always the way to go. However, if your roof is nearing the end of its expected lifespan, even minor damage might signal that the entire roof is becoming brittle and prone to further issues. In such cases, investing in a full replacement could save you money and headaches down the road.
Cost-Effectiveness and Long-Term Value:
While a repair might seem cheaper initially, frequent repairs on an aging, extensively damaged roof can add up quickly. We often advise homeowners to consider the long-term value. A new roof not only provides peace of mind and superior protection but can also significantly boost your home’s curb appeal and resale value. Comparing the cumulative cost of ongoing repairs to the investment in a full roof replacement is a smart financial exercise.
Can individual shingles be replaced?
Absolutely! For minor issues like isolated cracks, splits, or wind damage, individual cedar shingles can be replaced. This is a common and cost-effective solution for extending the life of your roof, provided the surrounding shingles and the underlying structure are still in good condition. However, for widespread damage or if the roof is approaching the end of its life, a more extensive repair or replacement may be necessary.
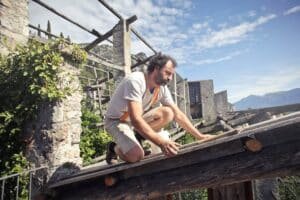
A Step-by-Step Guide to DIY Cedar Shingle Repair
For those smaller, localized issues we just discussed, a DIY cedar shingle repair can be a rewarding and cost-saving project. But remember, safety is paramount whenever you’re working on a roof.
Safety First!
Before we even think about touching a shingle, let’s talk safety.
- Ladder Safety: Always ensure your ladder is stable on solid, level ground. Extend it at least 3 feet above the roofline.
- Non-Slip Shoes: Wear footwear with excellent traction. Avoid leather-soled shoes that can be slippery.
- Safety Harness: For steeper pitches (5:12 or greater) or working near the roof edge, a safety harness and lines are non-negotiable. Your life isn’t worth a few dollars saved.
- Weather Conditions: Only attempt repairs on a warm, dry day when the shingles are more pliable and less likely to crack. Avoid windy or wet conditions.
DIY cedar shingle repair is generally suitable for single, easily accessible shingle replacements. If the damage is extensive, located on a steep section of the roof, or if you suspect underlying structural problems, that’s our cue to call in the professionals.
Tools and Materials Needed
Having the right tools makes all the difference. Here’s what you’ll need for a successful cedar shingle repair:
- Hammer: For driving nails and potentially prying.
- Slaters Ripper: This specialized tool is a lifesaver for removing nails hidden under overlying shingles.
- Pry Bar: A small flat pry bar can help gently lift shingles.
- Utility Knife: For trimming new shingles or underlayment.
- Replacement Cedar Shingles: Ensure they match your existing ones in type (shingle vs. shake), length, and thickness.
- Roofing Nails: Use corrosion-resistant nails, typically 2-inch stainless steel ring shank nails for durability, especially in our climate.
- Roofing Sealant/Cement: A quality roofing sealant or cement for a watertight finish.
- Chalk Line (Optional): A chalk line can help ensure straight alignment of new shingles.
- Block Plane (Optional): A block plane can be useful for trimming shingle edges.
Step 1: Removing Damaged Cedar Shingles
This is where the finesse comes in. We want to remove the damaged shingle without disturbing its neighbors.
- Isolate the Shingle: Locate the damaged shingle. It will likely be covered by the shingle in the course above it, and potentially overlapped by adjacent shingles in its own course.
- Gently Lift Overlying Shingles: Carefully slide your pry bar or a thin piece of wood under the edges of the shingles directly above and to the sides of the damaged one. Just lift enough to create a small gap.
- Extract Hidden Nails: This is the job for your slaters ripper. Slide the ripper underneath the overlying shingle until you feel the nails securing the damaged shingle. Hook onto the nail heads and give a sharp hammer blow to the handle to yank them out (or shear them off). There are usually two nails per shingle, located about ¾ inch from each edge and 1 ½ inches above the exposure line.
- Slide Out the Old Shingle: Once the nails are out, carefully slide the damaged shingle out. If it’s stubborn, you might need to use your utility knife to cut it into smaller pieces for easier removal.
Step 2: Inspecting and Preparing the Underlayment
With the old shingle gone, we have a window into the roof’s core.
- Check the Roof Deck: Inspect the exposed sheathing (the wooden boards or plywood beneath the underlayment). Look for any signs of rot, mold, moisture damage, or looseness. The sheathing should be firm and dry.
- Repair Minor Sheathing Damage: If you find small areas of rot, you might be able to clean them out and fill with an epoxy wood filler. For loose boards, secure them with 3-inch galvanized nails. If the damage is extensive, you may need to cut out and replace a section of the sheathing, ensuring it’s properly fastened to rafters or blocking.
- Ensure Underlayment is Intact: The underlayment (often felt paper or housewrap) should be free from tears or holes. If it’s damaged, cut a piece of new underlayment to fit, overlapping existing underlayment by at least 2 inches, and secure it loosely with a few staples. Rosin paper is sometimes used as an underlayment to allow for natural expansion and contraction of the sheathing and shingles.
Step 3: Installing the New Cedar Shingle
Now for the grand finale – putting the new piece in place to restore your roof’s integrity.
- Proper Placement: Slide the new cedar shingle into the gap. Ensure it aligns perfectly with the shingles in its course and the overlying shingle.
- Maintain Expansion Gaps: Cedar, like all wood, expands and contracts with changes in humidity and temperature. It’s crucial to leave a slight gap—about 1/8 to 1/4 inch—between the new shingle and its neighbors to allow for this movement.
- Nailing Technique: We’ll secure the new shingle with two corrosion-resistant roofing nails. Drive the nails about ¾ inch from each side edge of the shingle and approximately 1 ½ inches above the exposure line (the part of the shingle that is exposed to the weather). The nails should penetrate the sheathing by at least ¾ inch or go all the way through. Ensure the nails are driven flush, not overdriven (which can crack the shingle) or underdriven (which leaves the nail head exposed).
- Sealing for a Watertight Finish: For added protection, especially in areas prone to heavy rain or wind, we recommend applying a small bead of roofing sealant or cement under the tabs of the new shingle and along its top edge where it’s covered by the overlying shingle. This helps create a watertight seal and secures the shingle firmly. If you’re repairing a split or crack rather than replacing the entire shingle, apply sealant under the crack, press firmly, then apply a second bead on top and spread evenly with a putty knife. You can even sprinkle collected cedar granules over wet sealant to match the texture!
Long-Term Care: Maintenance and Knowing When to Call a Pro
Completing a cedar shingle repair is a great achievement, but it’s just one part of keeping your cedar roof in top condition. Long-term care and knowing when to call in the professionals are equally vital for maximizing your investment.
Preventative Maintenance Benefits:
Regular preventative maintenance is the secret sauce to extending your cedar roof’s lifespan well beyond the average 30-50 years. It helps prevent minor issues from escalating and keeps your roof performing optimally.
Best Practices for Cleaning and Maintenance:
- Debris Removal: Keep your roof surface clean of debris like leaves, pine needles, and branches. These can trap moisture, encouraging moss and algae growth.
- Gentle Washing Methods: If cleaning is needed, use mild pressure or water to remove large debris. Avoid high-pressure power washing, as it can damage the wood surface and fracture shingles if done improperly. If you must power wash, ensure it’s done by professionals with appropriate pressure settings and always washing downslope.
- Trimming Branches: Trim overhanging branches that can damage shingles, promote moss growth by shading the roof, or shed debris.
- Gutter Cleaning: Clean gutters regularly to prevent water backup, which can cause water to sit on the roof and lead to damage.
- Cleaning Solutions: For moss, mold, or lichen, specific cleaning solutions can be used. We recommend referring to the USDA Forest Products Laboratory document for recommendations on cleaning solutions. Zinc or copper strips installed at the ridge can also help control moss growth over time.
- Attic Ventilation: Ensure proper attic ventilation to reduce moisture buildup, which is crucial for the health of your cedar roof, especially in climates like ours in Illinois.
Cedar roofs are considered environmentally friendly. Cedar is a renewable resource, and its natural insulation properties contribute to energy efficiency. Proper maintenance extends the life of your cedar roof, reducing waste and its environmental impact.
DIY vs. Hiring a Professional for your cedar shingle repair
Deciding when to tackle a cedar shingle repair yourself versus calling a professional is a key part of responsible homeownership.
When to DIY:
- Single, easily accessible shingle replacements.
- Minor, localized cracks or splits on lower, easily reachable sections of the roof.
- Routine cleaning and debris removal.
When to Call a Professional:
- Multiple damaged areas: If more than a few shingles are damaged, or if the damage is widespread.
- Steep roof pitch: Safety risks increase significantly on steep or high roofs.
- Signs of underlying structural issues: Suspected sheathing rot, sagging rooflines, or consistent leaks.
- Matching shingles: Professionals can often source and match new shingles to existing ones for a cohesive appearance.
- Specialized treatments: Applying proper treatments to extend shingle life or addressing severe biological growth.
- For complex issues or peace of mind: A professional cedar shake roofing expert has the specialized tools, experience, and safety equipment to handle any cedar roofing challenge.
For homeowners in Naperville, IL, we understand the specific challenges our climate poses to cedar roofs. Whether you need trusted roof repair in Naperville, IL or a full roof replacement in Naperville, IL, our team can provide a free estimate to ensure your roof receives the expert care it deserves.
Finding a Local Cedar Roofing Expert
The importance of choosing a local expert cannot be overstated. A local roofing company understands the specific climate challenges of areas like Downers Grove and Naperville, Illinois. Our weather, with its heavy snowfall, significant rainfall, and freeze-thaw cycles, demands a particular expertise in roofing materials like cedar.
For residents in the Downers Grove, IL area, finding a specialist for roof repair in Downers Grove, IL ensures your roof is handled correctly. If the damage is extensive, we also provide complete roof replacement in Downers Grove, IL with knowledge of local building codes and best practices for our unique environment. We’re part of the community, and our reputation is built on knowing what works best right here at home.
Frequently Asked Questions about Cedar Shingle Repair
How long does a well-maintained cedar roof last?
A well-maintained cedar roof can last anywhere from 30 to 50 years, with some lasting even longer. Its longevity is directly impacted by factors like the quality of the original installation, the grade of the cedar used (higher grades like 100% clear heartwood last longer), the local climate (hot, humid climates can reduce lifespan), and the consistency of preventative maintenance. Regular inspections and timely repairs are crucial for reaching the upper end of this lifespan.
Can you repair just one part of a cedar roof?
Yes, individual cedar shingles or small sections can be replaced if the damage is localized and the rest of the roof is in good condition. This is a cost-effective solution for minor issues like isolated cracks, splits, or wind damage. The key is to address these small problems promptly before they can spread or compromise larger sections of the roof.
How do you stop moss from growing on a cedar roof?
Prevent moss by ensuring the roof is kept clean of debris like leaves and pine needles, which trap moisture. Trimming overhanging tree branches allows more sunlight to reach the roof, helping it dry faster. Proper attic ventilation is also essential to reduce moisture buildup. For persistent issues, zinc or copper strips can be installed at the ridge cap, which release fungicidal properties with rainfall. Additionally, you can use specific cleaning solutions recommended by the USDA to remove existing moss and inhibit regrowth.
Conclusion
We’ve covered a lot of ground today, from identifying the subtle signs of damage to performing a DIY cedar shingle repair, and understanding when to call in the experts. The key takeaways are clear: proactive inspection, timely repairs, and consistent maintenance are crucial for protecting your cedar roof.
A cedar roof is a valuable, long-lasting asset that adds immense beauty and character to your home when cared for properly. Ignoring small issues can lead to significant structural problems and costly interior water damage, diminishing both the value and safety of your home.
For homeowners who prefer a professional touch, Adept Construction, Inc. provides superior workmanship and customer service for all your roofing needs. We’re a family-owned business specializing in residential and commercial roof repairs, replacements, and installations, known for our knowledgeable staff and high-quality work. Don’t let a damaged shingle turn into a roofing nightmare. Contact us today for a free estimate on your roof replacement project or any cedar shingle repair needs you may have.