Bringing Light Into Your Life: The Ultimate Skylight Guide
Residential skylight installation typically costs between $900-$2,300, with most homeowners paying around $1,500. The process involves cutting an opening in your roof, installing a properly sized skylight unit with flashing, and ensuring proper waterproofing. While advanced DIYers can tackle this project, professional installation is recommended due to the risk of roof leaks and the technical skills required.
| Skylight Installation Quick Facts | Details |
|---|---|
| Average Cost | $1,500 (range: $900-$2,300) |
| Installation Time | 1-2 days for professionals |
| DIY Difficulty | Advanced (not recommended) |
| Main Types | Fixed, Venting, Tubular, Solar-Powered |
| Lifespan | 8-20 years (depending on quality) |
| Tax Credits | 30% Federal Tax Credit for solar options |
There’s something truly magical about natural light streaming through a skylight—it makes rooms feel larger, brighter, and more inviting. But as anyone who’s dealt with a leaky skylight can tell you, proper installation is absolutely critical. This guide will walk you through everything you need to know about residential skylight installation without losing your mind (or your roof).
A quality skylight does more than just brighten your home—it can reduce electricity costs, improve ventilation, boost your mood, and even increase your property value. Modern skylights are designed with energy efficiency in mind, using low-e coatings and argon gas fills to prevent heat loss in winter and heat gain in summer.
As founder of Adept Construction, I’ve overseen countless residential skylight installation projects throughout Chicagoland over my 25+ year career, specializing in leak-free installations that stand the test of time and Illinois weather.
Why Skylights Are a Bright Idea

There’s something almost magical about the way sunlight transforms a room. When it comes to home improvements that genuinely improve your daily life, residential skylight installation stands out as one of the smartest investments you can make.
Imagine waking up to gentle, natural light filtering through your ceiling, creating a connection to the outdoors even when you’re inside. This isn’t just about aesthetics – it’s about creating healthier, more vibrant living spaces.
Modern skylights deliver up to four times more natural light than traditional vertical windows. This abundance of daylight doesn’t just cut down on electricity use – it actually supports your body’s natural rhythms. Many of our Downers Grove clients report better sleep and improved mood after we complete their skylight projects.
Today’s energy-efficient skylights are engineering marvels. They’re designed to help with passive solar heating in winter while featuring UV-blocking glass that protects your furniture and flooring from sun damage. According to the Energy Efficiency Guide, strategically placed skylights can slash your lighting costs by up to 10% while seamlessly integrating with your existing roof structure.
What Is a Residential Skylight and How Does It Work?
Think of a residential skylight as a window for your ceiling – but it’s actually a bit more sophisticated than that.
A complete skylight system combines several critical components working together. The skylight unit itself contains the glazing (the glass or acrylic panel) that allows light to pass through. This is supported by a sturdy frame that anchors it securely to your roof structure.
The flashing is perhaps the most crucial element – it’s the weatherproofing system that creates a watertight seal between your skylight and roofing materials. Without proper flashing, even the most expensive skylight will eventually leak.
Finally, there’s the light shaft – the tunnel that channels sunlight from your roof down through your attic space to your ceiling. This can be straight, angled, or flared depending on your home’s structure and your desired lighting effect.
Top Benefits You’ll Notice on Day 1
The moment we complete your residential skylight installation, you’ll experience immediate benefits that make you wonder why you waited so long.
Your electric bills will likely drop as you’ll find yourself reaching for light switches far less often. Natural daylight simply makes artificial lighting unnecessary during daytime hours.
If you choose a venting skylight (one that opens), you’ll enjoy improved ventilation as warm air naturally rises and exits through the skylight, creating a pleasant cooling effect during warmer months.
From the street, skylights add architectural interest and curb appeal to your home’s profile. Inside, they create that “wow factor” that standard windows simply can’t match.
When you’re ready to explore how a skylight could transform your home, our team at Adept Construction is here to help. With decades of experience in roof installation throughout the Chicagoland area, we understand how to integrate skylights perfectly with your existing residential roofing for a leak-free, beautiful result.
Planning Your Residential Skylight Installation
The difference between a skylight that brings joy for decades and one that becomes a recurring headache? Proper planning. At Adept Construction, we’ve seen what happens when homeowners skip this crucial step, and we’re determined to help you avoid those pitfalls.
Roof Type and Condition
Your roofing material plays a huge role in how smoothly your residential skylight installation will go. Asphalt shingles tend to be the most forgiving and easiest to work with. Metal roofs, tile, and flat roofing systems require specialized approaches and techniques.
Timing matters too. Installing a beautiful new skylight on a roof that’s already showing its age is like putting expensive tires on a car that’s about to break down. If your roof is within 5 years of needing replacement, consider tackling both projects together. Our roof replacement in Downers Grove service can help coordinate this perfectly.
Slope and Pitch Considerations
Your roof’s pitch affects everything about your skylight options:
- For low-slope roofs (less than 3:12 pitch), you’ll need curb-mounted skylights to ensure water drains properly.
- Standard-pitch roofs (between 3:12 and 12:12) give you more flexibility, accommodating either deck-mounted or curb-mounted units.
- Steep roofs (steeper than 12:12) present some installation challenges, but they can create stunning light effects inside your home.
Placement Strategy: The 5% and 15% Rules
Here’s a professional secret: we follow what we call the 5% and 15% rules for skylight sizing:
- If your room already enjoys some natural light from windows, aim for skylights that cover about 5% of the floor area.
- For rooms with minimal or no existing windows, target around 15% of the floor area.
| Skylight Type | Best For | Installation Complexity | Average Cost Range |
|---|---|---|---|
| Deck-mounted | New construction, re-roofing | Moderate | $1,500-$2,500 |
| Curb-mounted | Retrofits, flat/low-slope roofs | Higher | $150-$1,500 (unit only) |
Choosing the Right Skylight Type & Size

The skylight world offers four main options, each perfect for different situations:
Fixed skylights are the most affordable (starting around $500-600), least likely to leak, and perfect for areas where ventilation isn’t needed. Think living rooms, hallways, or stairwells.
Venting skylights bring both light and air to your space. Choose between manual operation with a crank (around $950) or electric/solar-powered units (up to $2,500). These are ideal for kitchens and bathrooms where managing moisture is important.
Tubular skylights are space-savers at just 10-14 inches in diameter. They use reflective tubing to channel sunlight into tight spaces and typically cost about half what you’d pay for traditional skylights.
Solar-powered skylights represent the premium end of the market. They open and close automatically, often include rain sensors, and qualify for a 30% federal tax credit.
Location, Angle & Orientation Secrets
The direction your skylight faces isn’t just a detail—it’s crucial to how the installation will perform:
- South-facing skylights provide the most light and heat gain. They’re wonderful for warming spaces in winter but can make rooms too hot in summer without proper glazing or shades.
- North-facing skylights deliver consistent, indirect light with minimal heat gain.
- East-facing skylights welcome the morning sun, perfect for early risers.
- West-facing skylights capture afternoon and evening light, but can introduce significant heat during summer months.
At Adept Construction, we also pay close attention to your roof’s rafter layout. Cutting through rafters requires additional structural work and significantly increases both cost and complexity.
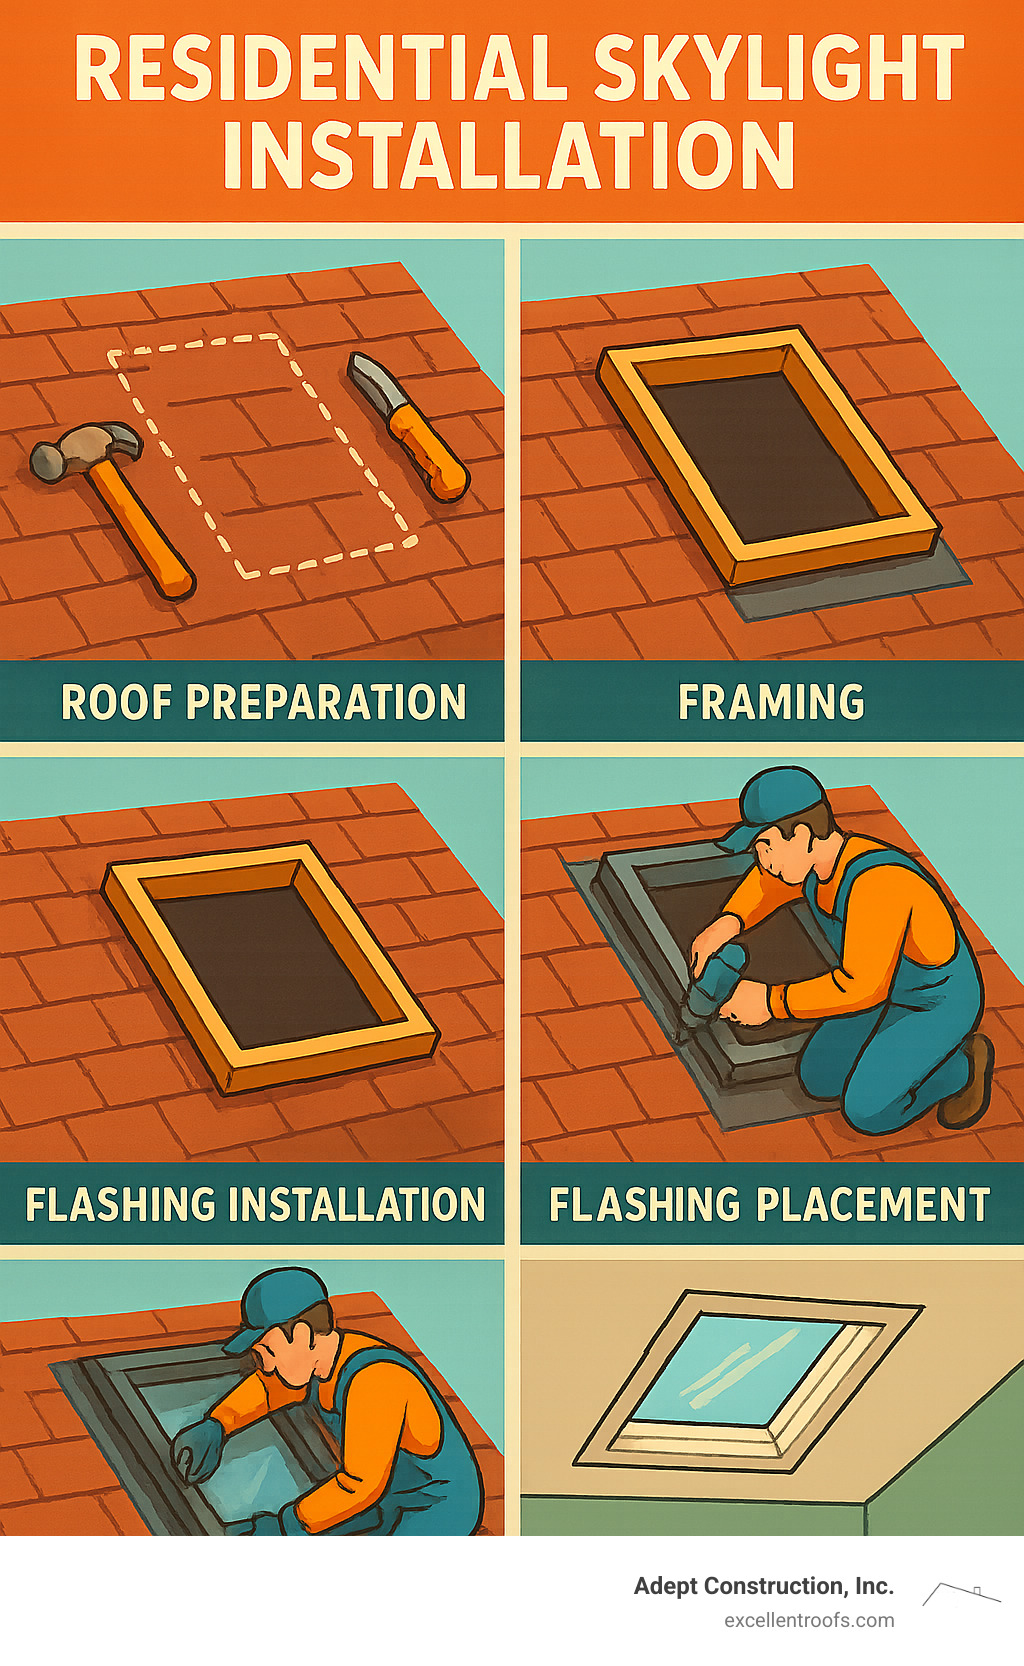
Step-by-Step Guide: Installing the Skylight Without Losing Your Mind

Ready to see how a residential skylight installation actually happens? Below is the condensed roadmap our Adept Construction crew follows on every job.
DIY vs. Professional Installation
While ambitious homeowners can tackle a skylight, remember:
- Roof work is dangerous without fall-protection and experience.
- Warranty coverage on most skylights requires certified installation.
- Local codes demand permits and inspections.
If your roof already shows wear, combine the project with roof repair or a full roof replacement to save time and money.
10 Critical Installation Steps
- Measure roof pitch to decide on deck- vs. curb-mount.
- Snap chalk lines between rafters.
- Frame the rough opening with headers.
- Center, level, and fasten the skylight.
- Apply ice-and-water barrier.
- Install sill flashing.
- Interweave step flashing with shingles.
- Add head (saddle) flashing.
- Replace shingles around the unit.
- Insulate the light shaft and install interior trim.
Improper flashing is the No. 1 cause of leaks we see—follow that sequence religiously.
How Long Will It Take?
Our team normally finishes exterior work in a single day, returning the next morning for interior touch-ups. DIY timelines often stretch to a long weekend, so plan accordingly and keep an eye on the forecast.
Understanding Residential Skylight Installation Costs & Incentives
Let’s talk about what matters to most homeowners – the bottom line. A residential skylight installation is definitely an investment in your home’s value, comfort, and energy efficiency, but understanding the costs upfront helps prevent any surprises.
Average Numbers You Can Bank On
Based on our years of experience installing skylights throughout Chicagoland, here’s what most homeowners can expect to pay:
For the skylight unit itself, prices typically range from $500-$600 for a basic fixed skylight, up to $950 for a manual venting model, and around $2,500 for premium electric or solar-powered venting options.
The professional installation labor generally adds another $500-$2,000 per skylight, bringing the total project cost to about $900-$2,300, with the national average hovering around $1,500.
What many homeowners don’t initially consider are the “hidden extras” that can affect your bottom line:
– Structural reinforcement: $300-$700 if your roof needs additional support
– Interior finishing work: $200-$800 for drywall, painting, and trim
– Electrical work: $300-$1,000 for powered units
– Permits and inspections: $100-$300 depending on your local municipality
Replacing an existing skylight? Budget between $1,800 to $2,500 for a complete replacement, which covers the new unit, flashing kit, underlayment, shingles, and any necessary interior repairs.
Tax Credits, Rebates & Financing Hacks
Here’s where things get exciting – you might qualify for significant savings that make your residential skylight installation much more affordable.
Solar-powered venting skylights are eligible for a substantial 30% Federal Tax Credit, and this includes both the unit and installation costs. For a $2,500 solar skylight with $1,500 installation, that’s a cool $1,200 back in your pocket at tax time.
Don’t overlook local utility rebates either. Many energy companies offer additional incentives for energy-efficient home improvements.
The perfect time to replace a skylight is during a roof replacement. At Adept Construction, we offer financing options that can cover both projects, and the installation is more efficient when done simultaneously.
Hiring the Right Pro (and Dodging Scams)

Finding a qualified skylight installer requires a bit of homework, but it’s worth the effort. Your roof is too important to trust to just anyone with a ladder and a saw.
First, verify they’re licensed, bonded, and insured specifically for roofing work. In Illinois, you can check roofing licenses through the Department of Professional Regulation.
Look for contractors with at least 40+ verified reviews across platforms like Google, Yelp, and the BBB. Pay special attention to reviews that specifically mention skylight installation, as it’s a specialized skill even among roofers.
Local expertise matters enormously. A contractor from the other side of the state might offer a tempting price, but they won’t understand the specific weather challenges we face in Downers Grove and Naperville. At Adept Construction, we’ve spent years learning exactly how to install skylights that stand up to Chicagoland’s freeze-thaw cycles, heavy snow loads, and summer storms.
Be wary of vague quotes and pressure tactics. Reputable contractors don’t show up uninvited after storms or push you to make immediate decisions.
If you’re considering a skylight as part of a larger roofing project, learn more about our roof replacement services in Downers Grove and how we can integrate beautiful, leak-free skylights into your new roof.
Maintaining, Troubleshooting & Eventually Replacing Your Skylight
Even the most beautifully installed skylight needs a little TLC to shine its brightest through the years. Think of your skylight as a loyal friend who just needs a check-in twice a year to keep the relationship glowing.
Cleaning Schedule and Techniques

Spring and fall make perfect bookends for your annual skylight cleaning ritual. When the daffodils bloom and again when the leaves fall, grab a soft cloth and mild, non-abrasive cleaner to give your skylight’s glass a gentle polish. While you’re up there, take a moment to inspect the seals and flashing.
Clear any leaves, twigs or debris from around your skylights. That innocent-looking pile of oak leaves can actually create a mini-dam that forces water to find creative entry points into your home.
One telltale sign to watch for: condensation between glass panes. If you spot this foggy situation, it’s signaling that your skylight’s seal has failed and is letting moisture creep where it doesn’t belong.
Common Issues & Quick Fixes
Most skylight hiccups can be addressed before they grow into headaches if you know what to look for.
When you notice condensation forming on the inside surface of your skylight, don’t panic! This usually points to high indoor humidity rather than a failing skylight. Improving your home’s ventilation or running a dehumidifier often solves the problem.
Unfortunately, when condensation appears between the glass panes, you’re facing a seal failure. In most cases, you’ll need either new glazing or a complete unit replacement.
Older skylights come equipped with tiny drainage channels called weep holes that can become clogged over time. A gentle cleaning with a thin wire can restore their function and prevent water buildup.
For minor leaks around flashing, a quality roofing sealant might offer a temporary fix, but this often masks deeper installation issues. When in doubt, having a professional from Adept Construction take a look can save you from more expensive repairs down the road.
When It’s Time for a New Unit
Even the finest skylights eventually reach retirement age, typically somewhere between 8-20 years depending on quality, installation expertise, and maintenance history. Here are the signals that it’s time to consider replacement:
- Persistent leaks that return despite repeated repair attempts
- Foggy views caused by seal failures that reduce your skylight’s insulating properties
- Cracked glazing that compromises both safety and efficiency
- Cold spots or drafts around your skylight suggesting it’s no longer providing a proper thermal barrier
The absolute perfect time to replace a skylight is during a roof replacement. When your residential roofing project includes a complete re-deck, adding skylight replacement to the scope creates significant cost efficiencies.
For tech-savvy homeowners, skylight replacement offers an opportunity to step into the future. Newer models integrate with home automation systems, allowing your skylights to respond to temperature changes, time of day, or even incoming weather fronts.
If your roof is showing signs of age alongside your skylight, it might be time to consider our roof replacement services in Downers Grove or Naperville. Tackling both projects simultaneously creates the perfect fresh start for the top of your home.
Frequently Asked Questions About Skylights (Fast Answers)
How long does a typical installation take?
A professional residential skylight installation usually wraps up within 1-2 days. Day one is all about the exterior work—creating that opening in your roof, positioning the skylight, and ensuring everything is properly weatherproofed. If your project includes custom interior finishing, you might need that second day to make everything look polished from the inside.
Can I claim a federal tax credit on a fixed skylight?
Only solar-powered venting skylights qualify for the 30% federal tax credit. The government specifically rewards skylights with solar-powered operation features, not the fixed units.
This tax distinction often guides our customers’ decisions when they’re on the fence between models. While fixed skylights are more affordable upfront, that tax credit can significantly reduce the cost gap between fixed and solar-powered options.
What’s the difference between deck-mounted and curb-mounted units?
Deck-mounted skylights nestle right against your roof deck (the wooden sheathing underneath your shingles). They create a sleeker, more streamlined look since they sit lower on your roof. These are popular choices for homes with standard pitched roofs.
Curb-mounted skylights perch on a raised frame or “curb” that stands above your roof surface. This design makes them ideal for flat or low-slope roofs where water runoff is a concern. They’re also the preferred choice when you might want to replace just the skylight unit in the future without disturbing the curb itself.
Do skylights always leak eventually?
This is probably the most common concern we hear, and I’m happy to put this myth to rest! Modern skylights with quality flashing kits, when properly installed, should remain leak-free throughout their entire lifespan.
The old saying that “all skylights eventually leak” comes from a combination of poor installation practices and older skylight designs that weren’t as advanced as today’s models. Contemporary installation methods, better materials, and improved designs have largely eliminated these issues.
If you’re concerned about your existing skylight, our roof repair services can address any issues before they become serious problems.
How do I know what size skylight to get?
We recommend following the 5% rule: for rooms that already have windows, your skylight area should equal about 5% of the floor area. For rooms with few or no existing windows, aim higher—around 15% of the floor area.
For example, in a 200-square-foot kitchen with existing windows, a skylight of about 10 square feet (roughly 2’×5′) would be ideal. Standard skylight sizes typically range from 14-72 inches wide and 16-96 inches long.
Will a skylight make my home too hot in summer?
Modern skylights are designed with this in mind. Today’s units with Low-E coatings and proper glazing actually help manage heat quite effectively. These coatings reflect infrared light (heat) while still allowing visible light to pass through.
For additional control, consider skylights with built-in blinds or shades that can be closed during the hottest parts of the day. The orientation of your skylight also plays a huge role—north-facing skylights provide consistent light without excessive heat gain.
Should I replace my skylight when replacing my roof?
Yes, absolutely! This is one of those synergistic home improvement opportunities that just makes sense. Replacing a skylight during a re-roofing project is significantly more cost-effective than doing it separately, and it ensures that your new roof warranty remains intact.
Most roofing experts, including our team at Adept Construction, strongly recommend replacing skylights that are over 10 years old during roof replacement. If you’re considering a roof replacement in Downers Grove or Naperville, let us evaluate your existing skylights as part of the process.
Conclusion
There’s something truly magical about sunlight streaming through a skylight—it transforms not just your rooms, but the entire feeling of your home. At Adept Construction, we’ve spent over two decades bringing that natural radiance into homes throughout Downers Grove and Naperville through expert residential skylight installation services.
Throughout this guide, we’ve covered everything from planning to maintenance, but what’s the bottom line? Quality matters—in every aspect. The materials you choose, the installation process, and most importantly, the contractor you trust with your roof. After all, even the most beautiful skylight becomes a headache if it leaks during the first spring shower.
This is why proper planning is so crucial. By thoughtfully considering placement, size, and type before the first cut is made, you prevent most skylight problems before they ever have a chance to develop. While DIY might seem tempting, the peace of mind that comes with professional installation is invaluable—especially when you consider that a properly installed modern skylight should remain leak-free for its entire lifespan.
Today’s skylights offer so much more than just natural light. Energy-efficient features like Low-E coatings and argon gas fills help manage temperature, while smart home integration allows you to control ventilation and shading with the touch of a button.
Whether you’re dreaming of adding skylights to brighten your existing home or including them as part of a new roof installation, our team at Adept Construction is here to guide you through the options and ensure a smooth, leak-free installation that will bring you joy for years to come.
Ready to bathe your home in natural light? Contact us today for a free consultation and estimate on your residential skylight installation project. As your local roofing experts in Downers Grove and Naperville, we’re passionate about bringing your daylighting vision to life with craftsmanship that stands the test of time—and weather.
Learn more about our comprehensive residential roofing services and find how we can help transform your home with the beauty and benefits of natural light.