Identifying the Warning Signs of a Tile Roof Leak
Repairing tile roof leaks is one of the most urgent home maintenance tasks you can face — and if you’re dealing with one right now, here’s what you need to know fast:
How to repair a tile roof leak (quick overview):
- Locate the source — inspect your attic for moisture trails and water stains, then check the roof surface 10+ feet upslope from the interior drip
- Apply a temporary fix — use roofing cement, a tarp, or sheet metal shims to stop active water entry
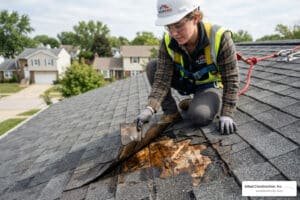
- Remove the damaged tile — use a flat pry bar to carefully lift surrounding tiles and slide out the broken one
- Inspect and patch the underlayment — this is the actual waterproofing layer; damaged felt must be repaired or replaced
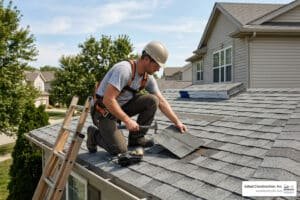
- Install a matching replacement tile — secure it correctly and lower surrounding tiles back into position
- Test your repair — run a garden hose over the area while someone monitors the attic
Act within 24–48 hours. A leak of just one drip per second can waste over 3,000 gallons of water in a year — and mold can begin growing in as little as 24–48 hours after moisture exposure.
Tile roofs are built to last. Clay tiles can survive 80–100+ years, and concrete tiles typically perform well for 50–60 years. But the underlayment beneath them — the layer that actually keeps water out — has a much shorter lifespan of just 20–30 years. That gap is where most leaks begin.
As of April 2026, many tile roofs installed during the building booms of the 1990s and early 2000s are now hitting that underlayment replacement window. If your home has a tile roof and you’re noticing moisture inside, the tile itself may be fine — but what’s underneath it may not be. Understanding how these two layers work together is the key to stopping leaks for good. For expert help, our roofing solutions cover everything from minor tile repairs to full underlayment replacement.
I’m Gerald Michaels, founder of Adept Construction, Inc., a family-owned roofing company serving the Chicago suburbs since 1997 — and after nearly three decades of repairing tile roof leaks across Naperville, Downers Grove, and the surrounding area, I’ve seen how a small crack in one tile can quietly cause thousands of dollars in structural damage. In this guide, I’ll walk you through exactly what to look for, what to fix yourself, and when to call in a pro.

Repairing tile roof leaks terms you need:

Finding a leak early is the difference between a $300 repair and a $5,000 restoration project. Water is a master of disguise; it rarely drips straight down from the entry point. Instead, it hits the underlayment, runs along a rafter, and might finally show up on your ceiling ten feet away from the actual hole.
Inside your home, keep an eye out for:
- Water Stains: Dark, tea-colored rings on the ceiling or walls.
- Mold and Mildew: If your attic smells musty or you see black spots on the underside of the roof deck, you have a moisture problem.
- Peeling Paint: Moisture trapped behind drywall causes paint to bubble and flake.
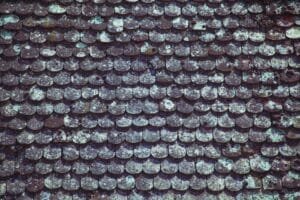
- Efflorescence: On the tiles themselves, a white, chalky powder can indicate that water is frequently soaking into the material and evaporating.
To truly master roof leak detection, you need to head into the attic. Look for “tracks” or stains on the wood. During the day, look for “pinholes of light” peeking through the roof deck. If light can get in, water definitely can. Check out our 6 signs you may have a leak in your roof for a more detailed checklist.
Early Warning Signs Outside the Home
You don’t always need to wait for a drip to know there’s trouble. A quick visual scan from the ground with binoculars can reveal small roof leak indicators before they become emergencies.
Look for:
- Cracked or Chipped Tiles: Even a hairline fracture can allow water to reach the underlayment.
- Slipped Tiles: Tiles that have shifted out of alignment leave the waterproof membrane exposed to UV rays, which destroy it rapidly.
- Debris Accumulation: Leaves and twigs trapped in the “valleys” (the internal V-shaped angles of your roof) act like dams, forcing water sideways under the tiles.
How to Safely Locate the Source
If you can’t find the breach visually, we use the “Hose Test.” This requires two people: one on the roof with a garden hose and one in the attic with a flashlight. Start at the lowest point of the suspected area and soak it for 10–15 minutes. Gradually move upward. When the person in the attic sees a drip, you’ve found your “X” on the map.
Always follow TRI Alliance installation standards when investigating. This means checking transitions, such as where the roof meets a wall or chimney, as these are the most common failure points.
Common Causes and the Critical Role of Underlayment

Here is a fact that surprises many homeowners: Tiles are not waterproof. They are “water-shedding.” Their job is to deflect 95% of the rain. The remaining 5%—and the heavy moisture from melting Illinois snow—is handled by the underlayment.
Underlayment failure is the #1 reason for repairing tile roof leaks. While clay and concrete tiles are nearly immortal, the asphalt-saturated felt or synthetic membrane beneath them lasts only 20–30 years. Once this layer becomes brittle or tears, the roof system fails.
Other causes of roof leaks include:
- Thermal Expansion: Tiles expand and contract with the Naperville temperature swings, which can eventually stress fasteners and create gaps.
- Capillary Action: Water can actually “climb” upward between overlapping tiles if they are dirty or improperly installed.
- Fastener Corrosion: Old nails can rust away, allowing tiles to slide.
Can a Single Broken Tile Cause a Leak?
Technically, the underlayment should stop water even if one tile is missing. However, that underlayment is highly sensitive to the sun. If a tile breaks and exposes the felt to UV light, the felt will deteriorate in a matter of weeks. Relying on the secondary barrier is a gamble you shouldn’t take. Understanding these 5 facts about roof leak repairs will help you prioritize these “minor” fixes.
Flashing Failures and Transition Zones
Most leaks don’t happen in the middle of a flat section of the roof. They happen at transitions:
- Chimneys: The metal “apron” or flashing around the base can pull away.
- Vent Boots: The rubber seals around pipes often rot long before the tiles do.
- Valleys: These carry the highest volume of water and are prone to clogging and overflow.
If you suspect these areas, expert guides on tile leaks suggest checking the sealant or “muck” used to bed the tiles at these junctions.
Step-by-Step Guide to Repairing Tile Roof Leaks
If you are comfortable with heights and have a relatively flat roof, you can tackle minor repairing tile roof leaks yourself. Here is how we do it professionally at Adept Construction, Inc.
- Safety First: Always use a stable ladder and a fall arrest system. Never walk on a wet tile roof—they become as slippery as ice.
- Lift the Overlapping Tiles: Use two wooden shims or a flat pry bar to gently lift the tiles directly above and to the sides of the damaged one.
- Remove the Broken Tile: If it’s nailed down, use the pry bar to pull the nail or gently break the tile around the nail head to slide it out.
- Inspect the Deck: Look at the exposed underlayment. If it’s torn, cut a patch of new matching underlayment (felt or synthetic) and slide it under the existing layer above the leak, overlapping it like a shingle. Secure it with roofing cement.
- Apply Plastic Roof Cement: Apply a bead of cement to the underside of the replacement tile where it will overlap.
- Slide in the New Tile: Hook the new tile over the batten (the wood strip). If you can’t nail it without breaking it, use a tile clip or a heavy dab of adhesive to keep it from sliding.
- Lower the Surrounding Tiles: Remove your shims and ensure everything sits flush.
For a deeper dive, New England Metal Roof’s guide offers excellent visuals on the “lift and tuck” method. The goal is to stop the rain from winning.
Essential Tools for Repairing Tile Roof Leaks
Before you climb up, ensure you have these essentials:
- Flat Pry Bar: For lifting tiles without snapping them.
- Caulk Gun & Plastic Roof Cement: Your primary sealant.
- Wire Brush: To clean the area so the cement actually sticks.
- Tile Clips: These are life-savers when you can’t reach the nail hole.
- Galvanized Flashing: Useful for quick leak fixes under damaged tiles.
Temporary Fixes During Heavy Rain
If it’s pouring in Downers Grove and you can’t get a permanent fix done, follow these emergency steps:
- Tarping: Secure a tarp at least 3 feet above the leak and drape it over the ridge. Never nail a tarp directly through your tiles.
- Sheet Metal Shims: You can often slide a 12×12 inch piece of galvanized steel under a broken tile to act as a temporary “bridge” for the water.
Safety Precautions for Walking on Tile Roofs
Walking on a tile roof is an art form. If you do it wrong, you will break more tiles than you fix, turning a $200 problem into a $2,000 one.
- Weight Distribution: Never walk on the edges or the very top of a tile. Always step on the “lower third” where the tile overlaps the one beneath it. This is the strongest point because it is supported by the batten and the tile below.
- Footwear: Wear soft, rubber-soled shoes.
- Clay vs. Concrete: Clay tiles are much more fragile than concrete. If you have an older clay roof, we strongly recommend using a roof ladder or walk-boards to distribute your weight.
- Safety Gear: Use a harness. Tile roofs often have steep pitches, and the dust on the tiles can act like ball bearings under your feet. Follow our Naperville roofing safety protocols to stay safe.
When to Call a Professional for Permanent Solutions
DIY is great for replacing one or two broken tiles. However, it is not the right choice for:
- Widespread Underlayment Failure: If you have leaks in multiple rooms, your underlayment has likely reached the end of its life. You need a “lift and relay,” where we remove all tiles, install new underlayment, and put the original tiles back.
- Structural Rot: If your roof deck is sagging or soft, the wood is rotting. This requires professional roof repairs to ensure your home remains safe.
- Complex Flashing: Chimneys and skylights require precision metalwork.
If you are in the western suburbs, seeking roof repair in Naperville or Downers Grove from a licensed contractor ensures the work is bonded and insured.
Understanding Repair Costs in 2026
Repair costs have stabilized in April 2026, but they still depend heavily on the extent of the damage.
| Repair Type | Estimated Cost (2026) | Time Required |
|---|---|---|
| Single Tile Replacement | $200 – $500 | 1–2 Hours |
| Minor Flashing Repair | $400 – $900 | 2–4 Hours |
| Extensive Underlayment Patching | $1,000 – $3,000 | 1 Full Day |
| Full “Lift and Relay” | $5,000 – $10,000+ | 3–5 Days |

Frequently Asked Questions about Repairing Tile Roof Leaks
How long do tile roofs last before needing major repairs?
The tiles themselves are incredibly durable. Concrete tiles last 50–60 years, while high-quality clay can last a century. However, you should expect to replace the underlayment every 20–25 years. If your roof was built in the early 2000s, you are likely entering that window now.
Is it safe to walk on my own tile roof?
Generally, we advise against it for the average homeowner. Beyond the fall risk, the risk of creating new leaks by cracking tiles is very high. If you must go up, stay on the overlaps and move slowly.
What should I do if my tile roof leaks during a storm?
- Protect the Interior: Move furniture and place buckets under the drip.
- Poke a Drainage Hole: If your ceiling is bulging, poke a small hole with a screwdriver to let the water drain into a bucket. This prevents the entire ceiling from collapsing.
- Safety First: Never go on a roof during a storm.
- Document: Take photos for insurance. Our emergency leak response guide has more on this.
Conclusion
Repairing tile roof leaks doesn’t have to be a nightmare if you catch the warning signs early. Whether it’s a cracked tile from a stray branch or underlayment that has finally given up after 25 years of Illinois weather, taking action now will save you from costly structural repairs later.
At Adept Construction, Inc., we’ve built our reputation in Downers Grove and Naperville by treating every roof as if it were our own. We specialize in high-quality residential roofing services, ensuring that your “forever roof” actually lasts a lifetime.
Don’t let a small drip turn into a big disaster. We offer free, no-obligation estimates to help you understand exactly what your roof needs. Whether you need a simple tile replacement or a full inspection, we are here to help.
Contact Adept Construction, Inc. today for your free estimate!